At a recent Stamp-In Workshop, my girls created this fairly simple card for one of their projects:
There were supplies left over after the workshop to create another card. For this one, though, I delved into my past Paper Pumpkin stamps stash for the sentiment label.
Using "hello" greetings from a Paper Pumpkin kit gave the center label a bit of a different look. I like it.
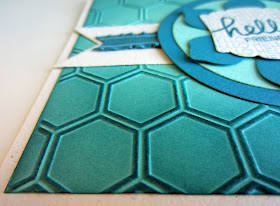
One of the things I really love about the Honeycomb Embossing Folder is how the outlines of the individual cells look when they are sponged over in a darker color than the embossing. It really makes the outlines of the honeycomb stand out prettily.
Wanna make one of these cards for your own use? Well, get going then, 'cause here's how to do it!
Supplies:
Choose Happiness stamp set
Naturals White cardstock (or Whisper White/Very Vanilla)
Pool Party cardstock
Island Indigo cardstock
Island Indigo ink
Big Shot
Circles Collection Framelits
Hearts A Flutter Framelits (or the Banners Framelits on page 173)
Artisan Label Punch (or Label Bracket Punch on page 166)
Fun Flower Punch
Honeycomb Embossing Folder
Stampin' Dimensionals
Basic Pearls
Island Indigo Ruffled Ribbon (or Island Indigo 1/4" Cotton Ribbon on page 159)
Stamping Sponge
Glue Dots
Tape
Directions:
Fold a half sheet of Naturals White cardstock in half, creasing well with a bone folder.
Run a 4" x 5 1/4" piece of Pool Party cardstock through the Big Shot inside the Honeycomb embossing folder. Sponges the edges and somewhat towards the center of this piece fairly thoroughly with Island Indigo ink, making the bottom portion quite a bit darker than the top. Adhere this piece to the card base.
On a scrap of Naturals White, stamp your chosen sentiment image in Island Indigo. Punch it out with either the Artisan Label Punch or the Label Bracket Punch. Add two Basic Pearls in the flourishes of the image if desired.
Punch out a Fun Flower from Island Indigo cardstock. Use the appropriately sized Circles Collection Framelits to cut circles from both Pool Party and Island Indigo cardstock. Adhere these circles together. With your fingers, curl up the ends of the flower petals. Use a Stampin' Dimensional to adhere the sentiment to the center of the flower. Using glue just in the center of the flower, adhere it to the middle of the circles.
Cut two banners from Naturals White using the Hearts A Flutter Framelits or the Banners Framelits. Cut pieces of the Island Indigo ribbon to measure about 1 1/2". Snip little banner notches in one end of each ribbon piece. Use Glue Dots to attach the ribbons to the banner pieces. Use Scotch Tape to adhere the two pieces to the back of the circle, being sure the ends of the banners extend to the edges of the card. Glue this whole piece to the card front.
Have fun!
Honeycomb
Smiles,


I love your cards and I pinned both of them! It was fun at the stamp-in even when I got tired!
ReplyDeleteI always enjoy seeing your cards. Thanks for sharing with the Thursday Blog Hop!
ReplyDeleteThis is so beautiful! You have quite a talent!
ReplyDeleteOMG I love how cute this is!
ReplyDeleteThanks for joining Cooking and Crafting with J & J!
Thanks for linking up on My 2 Favorite Things on Thursday!! I loved having you!! Hope you can join us again tomorrow!! Pinned to My 2 Favorite Things on Thursday Pinterest page!! :-)
ReplyDeleteI love both cards and how you included the directions to make it. So I may get my son and have him help me make one to give to his new teacher when school begins.
ReplyDeleteThis is so cute, I love these cards. Thank you for sharing and joining our Oh My Heartsie Girl Wordless Wednesday Link Party. Have a great day, co-host Evija @Fromevijawithlove
ReplyDeleteThese are so pretty. I love the choose happiness one, you could frame that. Thanks for posting. Hello from Treasure Box Tuesday.
ReplyDeleteOh my! This looks so fabulous! Pinned and tweeted. Please join us tonight at 7 pm, and party with us. I can't wait to see your new masterpieces or amazing classics! Lou Lou Girls
ReplyDeletePayday advances are a transient loan, when it is required the most...usually between paydays! Payday credits are an awesome method to get some money to hold you over to your next paycheck. The objective of payday advances is to help you with accounts to meet that unforseen prerequisite. Cash Advances corona
ReplyDelete