Tent topper cards are so much fun to make and they provide just a little added oompf in that they are not quite the traditional card.
Do you see how just a bit of the focal circle extends beyond the top of the card base? That's what makes it a tent topper card.
 |
| MAKE A SPRING TENT TOPPER CARD |
Over the past year or so, I have made a practice of stamping lovely images onto Designer Series Paper and then fussy cutting them out. So I have a generous stash of these lovelies that I can dip into whenever the whim hits me.
One word of warning about stamping onto DSP: The paper you choose for your images must not be too busy or too colorful. You see, if that is the case, you lose all the details of your stamping. Not a good thing at all. You want to be able to enjoy the loveliness of the stamped image against a softly-designed Designer Series Paper. Otherwise, what's the point, eh?
The flowers in the photo below are examples of fussy cutting images that are stamped on DSP. Can you see that the designs on the papers are quite subtle? That way, you have the best of both worlds.
The bumblebee in the center is also stamped and fussy cut, but simply done on Whisper White cardstock. I had added Clear Wink of Stella to the buzzy guy's wings, but I could not capture that in a photo. You'll just have to believe me that they do sparkle and glitter in real life.
I love this time of the year when trees are just starting to bud out. The landscape looks so new and fresh, almost pastel.
This card measures 4 1/4" wide by 4 3/4" tall. So, almost a square card. But, with these dimensions, it fits beautifully inside a traditional A2 envelope.The card base is a square 4 1/4" x 4 1/4". But, the circle extends 1/2" beyond the top of the card. This is what constitutes a tent topper card, the extension beyond the boundaries of the card base. The completed circle is popped up against the card base with Stampin' Dimensionals, to give it even more interest and importance.
The challenge of creating a tent topper card is in making it fit the dimensions of an A2 envelope, unless, of course, you want to create your own envelope with your Envelope Punch Board. The proportions of the finished card will depend on the size of your focal element.
Another peek at the fussy cutting. And, nope, you still can't perceive the shimmer on the bumblebee's wings.
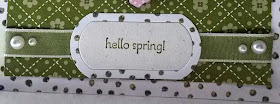
Another farewell to a retiring item is the label and matching frame. They are part of the Star Blast Edgelits Dies on page 11 of the Occasions catalog. I fell in love with this die set as soon as I spotted it in the catalog, and retired or not, I refuse to stop using it. It is appropriate for so many happy occasions! And, once May 31 arrives, it will be gone, gone, gone. Sob.
Another sadly retiring item is the Basic Pearls (and the Basic Rhinestones) shown on the ribbon strip below. The pearls and rhinestones have been around for so long and have served as a staple on a multitude of my cards. Unfortunately, through the retiring process both these items have already sold out. I am so glad I have several packages in my possession. So, I'm sure you will see them pop up on my creations now and again into the future.
One other thing that I was excited about regarding this card was mixing several Designer Series Papers together. Besides the papers in the flowers, notice that I have two green combo DSPs comprising the card base. It is such fun to find two papers -- not even from the same set or the same YEAR! -- that work so well together. They add to the fun and whimsical look of the card, working well with the green in the wreath.
And, here is my tent topper card once more, this time in the spring-y sun spotlight!
Go ahead! Make any card just a little bit more special by turning it into a tent topper card! It's fun and easy!
Spring-y
Smiles.


I will take a dozen cards to go please! These are so beautiful!
ReplyDeleteI really must ask you if you're serious about a dozen cards? Smiles, Linda
DeleteAbsolutely lovely! Anyone who is fortunate enough to receive one of these cards from you would feel so very special. :-)
ReplyDelete#happynowlinkup
Fun! I love homemade cards! Something a little extra special. Thank you for sharing at Dishing It & Digging It!
ReplyDeleteThank you for sharing such a cute card on Oh My Heartsie Girls WW this week!
ReplyDeleteWishing you a beautiful week!
Hugs
Karren
You make the most lovely cards. This one is fabulous.
ReplyDeleteThanks for sharing at Over The Moon party.
Hugs,
Bev
What a great card.... it is beautiful. :)
ReplyDeleteSorry I'm so late to stop by - been on vacation all week! Thanks for sharing on the Pleasures of the NW's DIY link up!
ReplyDeleteYour cards are always so pretty! Thank you for sharing at Ravenwould.
ReplyDeleteLove this card! Your fussy cutting skill is admirable to say the least! And, the attention to detail makes this card simply amazing. Beautifully done!
ReplyDeleteThis comment has been removed by the author.
ReplyDelete