Navigation Bar

August 29, 2017

DOODLE CATS

Are you a cat person? It is often said that either you are a cat person or a dog person. I personally can refute that statement because I love both cats and dogs. 

But, my persona as a dog person is fairly recent, oh, about 20 years, when Pebbles, a Lhasa Apso, came into our lives. Even though she ruined every single carpet in our house with her less-than-ideal potty habits, she was so lovable and turned me into a bona fide dog person. Then, of course, our Harley, our unforgettable Harley, who left our lives in December 2015, . . . well, because of him, I will forever consider myself a dog person.

However, a cat person? Yes! That's me. Furever and ever. Amen. As a kid, cats were part of our family on a few occasions. But, I always always loved kitties. Pretzel was my honey princess for 16 years, until she had to leave us about 3 1/2 years ago. Growing up with Pretzel, Fred, a stray, is still a part of our life. Remember Fred. At 11 years old, is our current -- and last -- resident kitty.

Anyway, being a furever and ever cat person, when I spotted the Cat Punch on page 53 of the Holiday Catalog (going live on September 1!), I had to have it. Even though I hadn't intended to purchase the coordinating stamp set on that same page, I just HAD to have the punch. The punched cat measures about 2" x 2".

When I first got the punch, I punched out a few cats from DSP, especially spooky Halloween type papers. Yeah. They were cute. But I KNEW I just had to do more <personal> things with punched kitties.

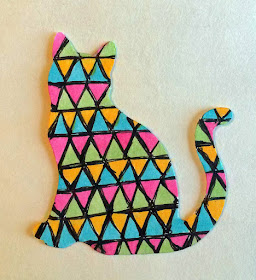
The photo below shows you my cat menagerie so far. I punch the cats from white cardstock. These white kitties can be facing either way. I start by penciling a design on the punched shape. I then spiff it up a bit with my Sakura Pigma pens. After that, I choose some of my Copic Markers, and go to work completing a unique original. 


So far, I have completed 11 cats that you won't find anywhere else in the world that make up my cat menagerie. I'd like to introduce you to them individually:

Bullseye Cat

Circle Cat

Bold Stripe Cat

Forget-Me-Not Cat

Triangle Cat

Checkerboard Cat

Diamond Cat

Big Square Cat

Wavy Cat

Starry Cat

Sunflower Cat


There! Now you have met what I've come to think of as my Doodle Cats. I hope you like them!

And here is the whole bunch one more time. I do have two more drawn, inked and ready to be colored. So this is not the end of this family. And I know many more will follow in their pawprints.


Now. I'd like to ask your advice. I get tired of using everything I create as part of a card. These Doodle Cats surely deserve a project all their own. Don't you agree? Do you have any ideas for projects where they would find a comfortable and suitable home?

Feline
Fine
Smiles.

August 26, 2017

A CHRISTMAS QUILT

I have been quilting lately. Shown below are my four most recent quilts. Aren't they adorable?


I know I had you fooled. You REALLY thought I had taken up quilting -- like with fabric and thread -- didn't you?

These cozy little Christmas quilts are made from paper! 

They are the end result when you take advantage of what I consider the star of the Creativity Delivered 2017 Holiday Catalog, which goes live to the public on September 1. The Suite I am referring to is Quilted Christmas, which can be found on pages 4 and 5 in the Holiday Catalog.

I realize that later on in the catalog, you can become smitten with mittens. But, I am tragically smitten with this quilted suite. 

The Quilt Builder Framelits Dies on page 5 include 15 dies. But the one I am most in love with is the second from the right, the square with a quilt pattern in the center. And then do you see the darling Quilted Christmas 6" x 6" Designer Series Paper stack at the bottom of that same page?

Using 3" squares of four of the different designs in the paper stack, plus, four 3 1/2" x 3 1/2" squares of Garden Green cardstock, with a 3 1/4" square of scrap cardstock for the back of the quilt piece, yields these four completed quilts! The die I referred to in the previous paragraph is the magic behind these little quilts.

I didn't notice until I had crafted several quilts that you can actually make four quilts using the same set of cut papers. I guess I'm a slow learner. But, by simply switching up the various pieces among the four quilts, you end up with four quite different-looking quilts, as can be seen in the four photos below. 


The perfect sections created with the die and the cardstock makes it so so simple to put together a quilt, and have it look perfect every single time.


Before I begin adding the quilt pieces to the diecut frame, I glue a 3 1/4" square of scrap cardstock to the backside to form a base into which you glue the quilt pieces.


I was going to leave the quilts as is, solely made of paper. After looking at them this way for a day, I decided to add the tiny buttons I'd had in my stash to the center of each one. Of course, it makes it more of a challenge for mailing, but I like the nice touch it adds.


Looking at the papers close-up, don't they look like actual quilting FABRIC? I am so impressed. And so in love.


By adding a Real Red mat and mounting it to a Whisper White card base, you end up with a precious 4 1/4" x 4 1/4" card -- with very little effort. It's a chance to let your tools do most of the work for you! 

And, at 4 1/4" square, the cards fit inside a traditional A2 envelope. Unless, of course, you want to make an envelope to fit it perfectly, then grab some paper and your Envelope Punch Board!


My girls will be making one of these cards at my September Stamp-In. You're welcome to come!

Quilted
Smiles.

August 23, 2017

COLOR CRAZY

I am here to permit you -- no ENCOURAGE you -- to get a little crazy with color once in awhile.


You see, I've been coloring these flowers for several months now. I finally got tired of trying to make them look realistic, traditional, and/or at least, cohesive.


Do you remember me talking about these coloring pages of Designer Series Paper that Stampin' Up! had available during Sale-A-Bration?

I love them, and am tending to hoard them. In fact, one of the designs is still sitting whole and untouched. I don't want to RUIN it! Huh? Linda!!

Two of the designs I had cut up into 3 1/4" x 4 3/4" pieces for a workshop I'd had featuring them. I took all the unused (unloved??) pieces that were left over, and stuck them inside a folder which I bring to the 319 Gallery where I volunteer each Tuesday.


Recently, while I was there I pulled out a piece similar to the one I show above. I looked at all those lovely hand-drawn flowers, trying to decide what to do. I'd colored them in so many different ways. I wanted something that wasn't so cliche.


I always bring along with me to the Gallery a random selection of my Copic Markers. Seriously, no rhyme or reason for the colors I bring with me. I'd love to bring them all, but since I have about 130 of them, it's way too heavy. So I just pack up whatever fits in a pencil box.

I decided to treat this sparse floral scene the same way -- randomly.

I blindly grabbed inside my container for a marker, and colored two petals in that color -- two petals not near each other, but on different parts of the canvas.

Next, I randomly selected another marker, and colored two distant petals in that color. 

I continued in that fashion until I had all the petals colored, sometimes reusing colors I'd already used. What a feast for the eyes! The mishmash of colors was so much fun! No rhyme or reason gave way to a plethora of colorful petals. Fun!

And talk about coloring being therapeutic! Doing it in this fashion requires little thinking. Just do it!


 I decided to leave the dragonfly as is, thus adding no color to him at all. Later on in the process, he seemed kind of like dead wood, so I added a layer of clear Wink of Stella. Of course, no matter how I positioned this while taking the photos, I could not capture the glisten. Just imagine that it really is there. It is!


After I had all the flowers colored in, sure, it was fun and vibrant, but there was so much WHITE space. I know, I know. A certain amount of white space is a good thing. A place for the eyes to rest, a break from the routine, etc. etc.


 But I wanted MORE! And I just did not want to color all that white space. Yuk. Boring.

So I drew in squiggly double lines to create a grid across the piece. Then, having three markers in the yellow family with me that day, I randomly colored in each of those squares with a yellow hue, not paying attention to the fact that sometimes the same color is next to the same color. Like I keep saying: RANDOM. The theme of this piece.

Do you notice that the black mat the piece is set onto is cut squiggly to match the squiggly lines of the grid? I thought that was a cool touch.


After I had my background completed, the flowers seemed a little lost. Believe it or not. With all that color. Refer back to the photo of the uncolored piece. See how the line work is just that? Line work?

So I had a great time RANDOMLY thickening the lines of the flowers. Yes! I really liked that!


Since, of course, because it's what I do, I turned the creation into a card. And here it is!


So there! How little fun it is to constantly follow the tried and true path. Have a blast and do things RANDOMLY! It will be a complete surprise as to what you end up with. Sure to be a little different and outside the box!

Random
Smiles.


August 20, 2017

TWO HEARTS INTERTWINED

This weekend, my niece married her love. I wanted to make a very special card to commemorate this union. 

The theme of "two hearts become one" has always appealed to me when making a wedding card. Not to break from tradition, I went with the same theme for this card. Only, I changed it up a tad by making the hearts become intertwined.


In a photo with a bit more dramatic lighting, 
the embossed falling hearts on the front of the card make an impressive showing.


A gatefold card, one of the hearts is mounted on either side of the gate. 
When the card is closed, the blue heart nestles inside the purple heart. 
Very romantic, eh?


You can see in the photo below how the hearts become enmeshed.


This photo shows the hearts being released a bit to show the interior of the card.


I love the sentiment I found -- part of the Beautiful Bouquet set on page 92. 
It is so perfect for a wedding, reading, "may you grow a wonderful life together". 


Set on an easel, I am showing the card partially opened.


Closing . . .


I intended, in this photo, to show how the blue heart carefully slipped inside the purple heart.


A close-up of the enmeshed hearts.


By the way, these elegant scribbly hearts are created from the heart die 
in the Sunshine Wishes Thinlits set, found on page 216.


In the following two photos, I have each gate of the card opened individually 
so you can see how I mounted the hearts onto the card.


Two hearts become one:


Wishing a long and happy marriage to Kevin and Megan. 

Intertwined
Smiles.