Navigation Bar

November 25, 2017

PEACEFUL PINES

Before the November Stamp-In workshop, I warned the girls that one of the cards they would be making incorporated a nontraditional element.

This is the card with the weird element:


A little bit of a close-up of the area where the nontraditional element is used:


Another preview of the card:


Not a lot of dimensionality in this card, which makes it so easy to mail. I love when that happens!


A photo of the nontraditional material. Any guesses?


Still wondering?


Following are the supply list and the instructions for making this card.

SUPPLIES:
Always Artichoke cardstock
Whisper White cardstock

Always Artichoke ink

Retired "Peace" stamp

Big Shot
Softly Falling Embossing Folder
Sizzix tree dies
Paper Snips
Sequins
Mini Stampin' Dimensionals
Fibrous material
Elmers Glue
Water
Flat paintbrush
Dazzling Diamonds Glitter
Glue stick
Tombow Multi Adhesive 

INSTRUCTIONS:
Fold a 5 1/2" x 8 1/2" piece of Always Artichoke cardstock in half, creasing it well with a bone folder.

Run a 4" x 5 1/4" piece of Whisper White cardstock through the Big Shot inside the Softly Falling Embossing Folder. (I put the lesser amount of dots at the top; maybe you'd like to switch that around. I think I would the next time I make this card.)

Using the 3" x 3" piece of white cardstock, add glue stick all over one side, being careful to cover it completely with glue. Take the fibrous material, and carefully center it atop the gluey cardstock. You can either force in wrinkles, as I did, or leave it smooth. Your choice. Press this down so it adheres nicely to the glued square. Carefully fold the excess edges of the fiber to the back of the square and adhere it in place so you have neat and even edges. Lay this piece on top of scrap paper and paint watered-down Elmers glue all over the surface. Then, holding the glued piece over a container of Dazzling Diamonds Glitter, drop the glitter all over it. Tap the excess glitter back into the container and close it. (Spilled glitter makes a humongous mess!) Set this piece aside to dry completely.

Cut the two trees out of Always Artichoke cardstock with the dies in the Big Shot. With a fine pointed scissors, trim out all of the straight line that runs up the center of both of the trees. It is way easier to do than you probably think it will be. NOTE: Several of my girls chose to leave the straight lines in their trees. It is a personal preference. I simply think the trees look more natural without that straight line going through the center.

Go back to your glittery piece. By now, it should be dried. Adhere it to a 3 1/4" square of Whisper White cardstock. Glue this over the embossed piece.

With tiny drops of glue in a few key places, add the trees, so one meets the top of the card and the other meets the bottom, with the trees overlapping each other. 

Add a few sequins/star to the sparkly background.

Stamp "PEACE" in Always Artichoke ink onto a 1/2" x 1 1/4" piece of Whisper White cardstock. Use a few Mini Stampin' Dimensionals to adhere this to the bottom alongside the trees.


Now is the time for the big reveal. The fibrous material I keep referring to is simply the wrapper from a women's sanitary product. Why throw valuable items away when they can be used as art supplies? Have you ever saved for a project what others would consider garbage?

Fibrous
Smiles.


November 21, 2017

BASKET OF THANKSGIVING WISHES

In honor of Thanksgiving, I'd like to share with you two similar cards. The only differences between the cards are the choice of Designer Series Paper (both are from the same DSP pack, Painted Autumn, on page 49 of the Holiday Catalog), the color of embossed cardstock and the treatment of the basket of veggies.

The card below features the filled basket colored with alcohol-based markers:


The following basket of veggies is colored with Crayola colored pencils.


A close-up of the alcohol-based markers:


A close-up of the Crayola colored pencils:


And the two cards side by side:


The girls at my November Stamp-In created the card on the right. Following you will find the supplies and instructions for making that card.

SUPPLIES:
Basket of Wishes stamp set

Painted Autumn Designer Series Paper
Crushed Curry cardstock
Early Espresso cardstock
Very Vanilla cardstock

Memento Tuxedo Black Ink
Colored Pencils or Stampin' Up! Watercolor Pencils

Big Shot
Cable Knit embossing folder (page 211)
Circles dies
Stitched Shapes dies
Water to spritz
Filament trim (or 5/8" Burlap Ribbon on page 49 of the Holiday Catalog)
Scotch tape
Stampin' Dimensionals
Aqua Painter (if you are using the Watercolor Pencils)

DIRECTIONS:
Fold a 4 1/4" x 11" piece of Very Vanilla cardstock in half, creasing it well with a bone folder.

Mist with water on both sides of a 1 1/2" x 5 1/4" piece of Crushed Curry cardstock. When you are finished, run it through the Big Shot inside the Cable Knit embossing folder. Set this piece aside to dry while you are coloring your basket of veggies.

On a 2 3/4" circle die cut from Very Vanilla cardstock, stamp the basket, then the veggies inside it, with black ink. It is up to you which colored pencils you would like to use to color in your focal point, either the Watercolor Pencils with an Aqua Painter, or the regular colored pencils. I did not spend much time on my coloring with the colored pencils.

Mount this circle to an Early Espresso circle cut with the largest circle from the Stitched Shapes dies. Set aside.

Now, take a piece of scrap cardstock that measures 4" x 5 1/4". This will be the base upon which you will build the next layer. Adhere the piece of DSP to the top of the base, followed by the embossed piece, lined up flush with the bottom of the base. Adhere a 1" x 5 1/4" strip of Early Espresso cardstock over the intersection of these two pieces. Stretch a piece of the filament trim (or Burlap Ribbon) across the brown strip, and carefully tape the ends to the back of the base.

Adhere the finished base to the card front.

Glue the colored basket piece to the card front.

Add sentiment of choice to the inside of the card, stamped in black ink.

WISHING YOU AND YOURS A BUSHEL BASKET 
FULL OF HEARTFELT THANKSGIVING WISHES

Thankful 
Smiles.

November 18, 2017

PORTRAIT OF A REINDEER

Don't you just love this portrait of a reindeer hung upon matching reindeer wallpaper??

I have to confess that I thought the Be Merry Designer Series Paper shown on the top of page 113 was pretty cute when I first saw it. So I ordered it. But, when it arrived and I was able to get a look at the white deer upon red design up close and personal, I fell completely in love! The rest of the DSP pack is wonderful also, but that little deer print simply reached out to me.

And, then I realized that I had ordered the stamp set, Merry Mistletoe, shown on the same page, earlier. It was waiting patiently in my creating area to be loved. The deer from the stamp set was identical to the ones parading all over that DSP!


I decided to pair the two up in a single card. It was just meant to be! 

Gold and rich red are so nice together, so that's the route I decided to take. I embossed the deer as well as the Merry Christmas from the same set in gold. The backdrop for the reindeer piece was cut with one of the Stitched Shapes ovals. I fussy cut the sentiment to give it a nice and neat look. 

After cutting one of the gold Metallic Foil Doilies (page 194) in half, they were perfect to frame either side of the deer piece. 


The card has just the right amount of dimension. Actually it could be mailed easily without any added postage. Always a plus.


Isn't that gold embossed reindeer stately and elegant? 


And a little close-up of the adorable reindeer DSP:


This card was so much fun to create, and it came together just wonderfully. I love it when that happens. Such satisfaction.


Did you purchase any of the Christmas DSP this year, whether from the big catalog or from the Holiday Catalog? Which one piece is your very favorite?

Reindeer
Smiles.

November 14, 2017

SIX WHITE LEAVES

Those of you who have been following my blog for awhile are already aware of my obsession with the emboss resist technique. Anyone who is new here, well, let me introduce you to a wondrous technique with lots of wow factors.

For starters, an example of a finished card utilizing the emboss resist technique is shown below:


When using the emboss resist technique, you are sure to have eye-popping results that always please. It is a technique that is fairly difficult -- to ruin. 


To do the emboss resist technique, start out with a base of light-colored cardstock. In this case, I used a 4" x 5 1/4" piece of Whisper White cardstock. The most important thing to remember when doing this technique is to USE YOUR EMBOSSING BUDDY! It is definitely your best friend. Rub the entire surface of the cardstock with the Embossing Buddy to remove any static that could result in ugly spots of embossing exactly where you don't want them.

Carefully ink up the stamp(s) you choose to use on your background with VersaMark ink and stamp all over the prepared cardstock. You can see in the photo below that I do overlap a bit, but I try to keep the images as concise and separate as possible for maximum effect.

Once you have your images stamped with VersaMark, add White Embossing Powder to the entire surface. Tap the excess powder back into its container for future use.

With the heat tool, heat the images, moving the heat a bit so it doesn't end up scorching the paper. Once all the images are shiny and hard, they are embossed. 


Now, the real fun begins. Choose your color palette if you haven't already. Be careful when using too many secondary colors -- orange, green and violet. When these guys are combined, they quickly turn into brown. To play it safe -- at least, until you are accustomed with which colors don't play well together -- stick with the primary colors of red, blue and yellow, or hues thereof. These guys are best friends and will never lead you astray.

With a sponge for each color (I cut my stamping sponges into wedges so they go further), begin with your lightest color. Randomly sponge soft spots of this color across the embossed images. Continue in this vein with the other colors. In my card, I did use primary colors. And, here is a little color theory: You can see in my card how when yellow and blue collide, it forms a lovely green, blue and red makes purple, and combining yellow and red yields an orange.

Once the cardstock is filled with colors, you can now begin intensifying the colors in certain spots or everywhere. This is your choice completely.

After reaching the intensity of color you were striving for, take a tissue and gently rub over the embossing to remove any excess ink that remains. This makes your images pop like crazy!

You can do this technique with any color of embossing, including metallics. But the lighter the embossing is -- in this case, white -- the more the embossed images will stand out.


Since the leaves on my card had all those wonderful dots, I echoed the dot pattern by inking dots on the two edges of my sentiment piece. 


My final result:


Have you ever in your creative play tried the emboss resist technique? What do you think of it? If you are familiar with it, like me, do you go back to it time after time after time? If you've never tried it, would you do yourself a favor and give it a go? If you do, you'll never look back. I promise.

Embossed
Smiles.


November 11, 2017

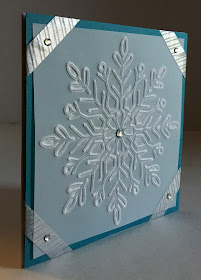
EMBOSSED VELLUM SNOWFLAKE

At the October Stamp-In, my girls created an elegant card that incorporated the new Winter Wonder Embossing Folder and Vellum Cardstock. A truly striking combination. Wouldn't you agree?


Vellum is so tricky to adhere to any surface without the adhesive showing through. 
An easy fix for that is to hold the vellum in place with washi tape.


A close-up of the embossed Vellum Cardstock. Isn't it stunning?


The inside of the card:


If you would like to try YOUR hand at re-creating this card, here are the list of supplies and directions:

SUPPLIES:
Flurry of Wishes stamp set (page 116)

Island Indigo cardstock
Whisper White cardstock
Vellum cardstock

Island Indigo ink

Big Shot
Winter Wonder Embossing Folder (page 37 of the Holiday Catalog)
Basic Rhinestones
Washi Tape (I used a silver stripe)

DIRECTIONS:
Fold a 9" x 4 1/4" piece of Whisper White cardstock in half, creasing it well with a bone folder.

Run a 4" square piece of Vellum Cardstock through the Big Shot inside the Winter Wonder Embossing Folder.

Center the embossed piece onto a 4 1/4" square piece of Island Indigo cardstock. To hold the vellum in place, use your choice of washi tape by tearing off a strip of the tape and wrapping it over the four corners, securing the vellum to the card. Stick the ends of the washi tape onto the back side of the blue cardstock. Add a Basic Rhinestone to each of the four corners, centered on the washi tape. Adhere a larger Basic Rhinestone to the center of the snowflake.

Mount this finished piece onto the 4 1/4" square card base.

Inside the card, in Island Indigo ink, stamp the sentiment and one of the snowflakes from the Flurry of Wishes stamp set.


Vellum
Smiles.

November 7, 2017

WREATH ON A BRICK WALL

Did you happen to notice the loveliness that is the Painted Autumn Designer Series Paper (page 49 of the Holiday catalog)?

Each and every one of the designs in this pack is beautiful, and I'd have a really difficult time choosing just one favorite. Seriously. While most of the sheets are definitely autumn-colored, one in particular jumped out at me as being a little too GREEN for fall. To me, this particular design reminded me of the beautiful wreath stamp set (and matching dies) that retired with the last catalog. Oh, woe is me! I love that wreath. LOVE IT.

I did not invest in the coordinating dies. And that is mostly because I decided not to stamp it "correctly" so it could be cut out with the die. I stamped each layer more randomly. Thus I was forced to -- OH NO! FUSSY CUT! -- the wreath. Which, of course, I absolutely love to do.

Since I refuse to ever get rid of my Christmas stamp sets, I intend to use them year after year. It matters little to me that a set may be retired. If I love it, I will use it.

Anyway, back to this sheet of DSP. The card I made using it is shown below. Doesn't the design match up well with the leaves and berries in the wreath? Kismet.

I stamped the wreath to mimic the colors in the DSP. When I finished the stamping, I cut it and the ribbon bow out. I discovered that laying the wreath against the busy background was an absolute no-no. It pretty much got lost.


To make this card even a little more special and to give the wreath a home of its own, I incorporated a few other Stampin' Up! products, pictured below. I used the Embossing Paste, one of the Palette Knives and the brick wall from the Pattern Party Decorative Masks, all shown on page 201. And, notice that little scrap of paper at the bottom of the photo? I will get back to that.


Being fairly haphazard when applying the Embossing Paste through the brick wall mask, I used the technique on a quarter sheet of Very Vanilla cardstock. I did not want my bricks to be perfection. BO-RING. 

From that quarter sheet of cardstock, I die cut a circle that enshrined the fussy cut wreath.


I was careful about the placement of the circle die so I had a nice strip of the brick wall left over to add to the bottom to carry the brick look throughout the card. The bottom strip measures  3 3/4" x about 1 1/4".

For the sentiment across the small brick wall, it is, of course, from a retired set. I stamped it and carefully cut it out, adding it to the card with a couple Mini Stampin' Dimensionals.

OK, now is the time to talk about that scrap of paper in the previous picture. I applied ink direct to paper to make the Very Vanilla the same color as the berries. I then punched out two dots with the 1/4" circle punch. I also punched out two 1/8" dots from the matching green cardstock. Piling these on top of each other, I created my own little embellishments.


I added clear Wink of Stella to the berries and to the green dots in the embellishment. I am chagrined that -- once again -- the sparkle does not make itself apparent in my photo.


Oh, why not?? Let's take another close look at the lovely DSP.


This card came together so well, with the help of the non-autumn-ish DSP. It makes me smile when I look at it.


Have you been using the Embossing Paste and masks? What have your experiences been with the product? 

I really love using it. It is a cinch to add a cool dimensional background to any card. The only thing you need to worry about is quickly cleaning off your mask and palette knife before the paste hardens on them and . . . well, that wouldn't be a good thing. 

Non-Autumn-Ish
Smiles.


November 4, 2017

ANOTHER PIRATE BIRTHDAY

 I won't be teaching you any new technique in this post. But, I WILL tell you a little story. Here goes:

Once upon a time, a long time ago, Stampin' Up! released a stamp set that featured a cute little pirate called Ahoy Matey!

My youngest daughter, Sarah, completely fell in love with that set. She informed me that forever and ever, any time I made a card for her, I MUST use this set.

Well, the years rolled on, and I did use Ahoy Matey! in many of her cards. But, I, for one, like a bit of variety, so wasn't completely faithful about using the pirate in EVERY card I made for Sarah.

It became a little more fun to incorporate the pirate -- and sometimes other stamps from the set -- in cards as she became older.

Well, Sarah turned 34 this weekend. So, Mom HAD to use the little constant pirate in her card.

Since her last birthday, Sarah has gotten married and had a little boy, our grandson, Enzo. Sarah is very particular about how Enzo is dressed. I wouldn't dare buy clothing for him, since it would probably not meet with her approval. Suffice it to say, he always looks like a little doll. Sarah Style.

Enzo -- and Balti, her husband -- have become the center of Sarah's world. Because of these couple of mentions, I decided to incorporate a little sleeper -- in Enzo colors -- into the card by hanging it on her hook. And, this is what I came up with:


I used my beloved Prismacolor Pencils to add the color to the card. 
The dots were added with a white gel pen.


I stamped and colored the gift package (from the Birthday Delivery set on page 69), 
then fussy cut it to add to the tip of the pirate's sword. 


Seen from the side, it is obvious that the only dimensional part of this card 
is the gift package, which is popped up with a Stampin' Dimensional.


I know it's not obvious, but the sword is colored with a metallic silver pencil. 
I also added some Wink of Stella to it so it really glistens like metal. 
It actually does in real life.


 So, that is how my little story ends.


Happy Birthday, Sarah!

Arrgh
Smiles.