Navigation Bar

January 29, 2019

HELLO CUPCAKE

Sale-A-Bration is in full swing at Stampin' Up! The best promotion of the year actually runs through March 31. If you haven't seen the brochure yet of all the freebies you can get with a qualifying purchase, you can virtually flip through it HERE.

In my card today, not only do I feature two of the products from the Sale-A-Bration promotion, but a stamp from the Annual Catalog, as well as two products featured in the current Occasions Catalog.

The ribbons on the card unfortunately were so popular as Sale-A-Bration freebies, that they are all sold out. It had been five reels of this luscious organdy ribbon.

The cupcake stamp is called Hello Cupcake and can be found on page 6 of the SAB brochure. I love the scribbly lines of the art in this set. The sentiments and the accessory stamps are also pretty sweet.


The fabulous embossed texture that is highlighted in the photo below comes from the Dot To Dot Textured Impressions Embossing Folder on  page 25 of the Occasions Catalog. Isn't it just the cheeriest embossing ever?!?

Who doesn't love GINGHAM?? In the Occasions Catalog, on page 35, you can get your fill of gingham Designer Series Paper. Coming with eight 6"x 6" sheets of each of five yummy colors, each sheet features a smaller check on one side and its larger counterpart on the reverse side. The five Gingham Gala DSP colors actually match up with the five colors in the aforementioned reels of SAB ribbon: Balmy Blue, Daffodil Delight, Grapefruit Grove, Highland Heather, Lemon Lime Twist with Whisper White.

The Balmy Blue "celebrate" stamp I used for my sentiment is from a cute set on page 11 of the Annual Catalog called Calligraphy Essentials. All of the words, with one exception, work well with the Stampin' Blends. I know. I've tried them.


In making this card, I was originally designing a card for my February Stamp-In Workshop. I love the way it turned out, and I think my girls would too. Unfortunately, each card requires a 4" x 5 1/4" piece of the DSP. When the sheets are merely 6" x 6", you need an entire sheet for each card. Unfortunately, if I am lucky enough to have my full contingent of girls at the workshop, I wouldn't have enough of the Daffodil Delight paper. 

Frustrated at that point, I modified my design a bit and that's what the girls will be creating on February 11. I am keeping that particular design a secret so as not to spoil their surprise. It is very similar to what I show here, but uses a bit less DSP. 


I must note that my photos are not as bright and cheery as the actual colors of the card are. I need to do something with my photo staging system to alleviate this continual problem I've been experiencing recently. I apologize.

REMEMBER SALE-A-BRATION! Stampin' Up! will release additional SAB freebies for you to choose from on February 15! I can't wait to see what more we can select from! If you'd like to shop through me -- and I'd love it if you would! -- you can click on any of the catalog icons on the right margin of my blog. Otherwise, hit the Shop Now button at the top.

SAB
Smiles.

January 26, 2019

MORE #dailycreating

My husband had a heart attack last week. Even though he's had three stents put in so far, and is supposedly fine, he still needs another 80% blockage fixed in a few weeks. He's not worried. I am. That's my special talent. Worrying.

Worrying is very disruptive to life and living. 

Since that happened, I haven't been quite myself. Usually a stressful situation calls for Creative Therapy, which benefits me wholeheartedly (excuse the pun). Going down to my Creation Station is more annoying now than comforting. The same with my Gelli printing.  I hope that changes.

The only thing that I am able to keep up with is my daily drawing. I am part of Terry Runyan's Daily Creating Group on Facebook. The night of the heart attack, I was too drained to do my daily prompt. But, that's the only night I've missed. I do find comfort and satisfaction in struggling with these daily drawings.

Drawing was once my forte. Not any more. It's like I have had to start my 10,000 hours all over again. So, it's practice, practice, practice.

Following you will find eight of the drawings I've done since late December. Having started this daily creating in late August, I'd shared with you a few of my beginning drawings here. Take a gander, and see if I've improved at all since beginning.

By the way, for colored drawings, I use Copic Sketch Markers exclusively. I am really going through the ink! Before each picture, I will give the prompt for that drawing. 

Terry Runyan, the person who started this wonderful group, gives us a week's worth of prompts each Sunday. The prompts are optional. She just wants to encourage us to do something creative each day. I follow the prompts religiously. Terry usually has Wednesdays as "Thing on Thing" day. Use your imagination! Also, she had started out every Saturday as "Caturday". A little while ago, she changed the Saturday prompt to "Caturday/Dogurday". 

I am an avid lover of cats. But, lately I've been opting to use Saturdays as Dogurday. That will explain the strange prompt for the first of these drawings.

Here goes:
#dogurday

#sledding

#party

#thingonthing

#houseplant

#penguin

#polkadots

#giraffe

I need to apologize for the poor quality of these photographs. The sketchbook that I am currently working in contains paper of not very great quality. It IS white, but always photographs somewhat grayish.

One of the banes of my artistic existence is the fact that I have no imagination. All the imagination in the family went to my daughter, Emily Balsley, an illustrator who lives in Madison. Nope. I have no imagination whatsoever. I need to constantly work from some sort of reference. Grrrr.

I hope my desire and muse for cardmaking returns. I've made a few cards since that yukky day last week, but I am not satisfied with any of them. Keep your fingers crossed for me that my card muse returns -- and quickly! I have a workshop coming up in February.

When I finish this blog post, I am off to draw #lamp/lamps. 

Are you a big worrier? Worrying is one of the things that I am a pro at. Not that I'm proud of having to admit that. I just can't help it. It doesn't improve a situation any. In fact, it definitely is detrimental to my emotional health. But, there it is. Me = worry wart.

The Fine Print: Please respect that these are my personal drawings and not meant for any type of use by anyone but myself. Thank you!

Drawn
Smiles.

January 22, 2019

UNICYCLE FROG

At my January Stamp-In Workshop, this is one of the cards my attendees made. It features one of the three darling frogs from a Sale-A-Bration sets, So Hoppy Together.

Before I go any further, let me tell you a little bit about Sale-A-Bration, the biggest and best promotion Stampin' Up! holds each year. 

This year, Sale-A-Bration (hereinafter referred to as SAB because it's too long to type out!) is being held from January 3 through March 31, 2019. During this period, for every $50 you order (before shipping and tax), you get to choose one of the free items in the special SAB brochure. Once you reach a $100 level, there are a few higher end products you can pick from. As reported in the brochure, another set of exclusive FREE items will be added on February 15!

The products being offered for free during SAB are really adorable, and only available during this short time period. 

Let me know if you'd like to get in on this great promotion!


Anyway, back to Unicycle Frog. 

This card features the high-ridin' frog and three little fluttery buggies above his head, stamped in Memento Tuxedo Black ink, then colored in with Aqua Painters and Watercolor Pencils. 

The addition of a couple of sequins, some pretty ribbon and two prints of Designer Series Paper finishes off our cute card..


Just a close-up of how I colored my images for my sample:


Following is a tutorial on how to re-create a card similar to mine.

SUPPLIES:
Whisper White cardstock
Calypso Coral cardstock
Granny Apple Green cardstock
Designer Series Paper

So Hoppy Together (page 13 of the SAB brochure)
WishingYou Well (page 35 of the Holiday Catalog, but I believe it's still available)

Watercolor Pencils
Memento Tuxedo Black Ink

Aqua Brush
Sequins
Crushed Curry Ribbon
Mini Glue Dots

DIRECTIONS:
Fold a 5 1/2" x 8 1/2" piece of Whisper White cardstock in half, creasing it well with a bone folder.

In black ink, stamp the unicycle frog and the bug-eyed bees onto a 2 1/4" x 4 1/4" piece of Whisper White cardstock. With Aqua Painters and Watercolor Pencils, color in the frog and bees as you wish. I find it works best to take color off the point of the pencil with the Aqua Painter, then paint with it.

Mount this onto a 2 1/2" x 4 1/2" piece of Calypso Coral cardstock. Then, mount this onto a 2 3/4" x 5 1/4" piece of Granny Apple Green cardstock, leaving equal margins on the top and sides.

On a 1/2" x 2 1/2" strip of Whisper White cardstock, stamp the sentiment in the center. Adhere this underneath the Calypso Coral edge. Add sequins to each side of the sentiment.

Mount a 1 1/4" x 2 1/4" piece of the striped Designer Series Paper to the upper left corner of the card front, leaving even borders at the top and right edge. Follow this with a 1 1/4" x 3" piece of the citrus slice DSP, butting them together and leaving equal margins on the right and bottom.

Leaving equal edges at the top, bottom and right side, adhere this panel to the card base. It should butt up against the DSP you'd already adhered.

Cut a piece of yellow ribbon and tie it into a knot. With three Glue Dots, attach it to the place where the two DSPs meet. Trim the ends of the ribbon as needed.


Please don't forget about Sale-A-Bration! If you have any pricier items on your Wish List, now would be the time to order them because you get FREE STUFF! Let me know if I can help!

SAB
Smiles.


January 19, 2019

BRUSHO HUMMINGBIRD

First of all, I must apologize for the quality of -- or lack thereof -- the photos in the blog post. It's a fairly sunny day, I used my portable light box, everything was the same as always. But, the photos are still off. 

The background is Bermuda Bay. Any of you who are familiar with the Stampin' Up! colors know that this is not an accurate depiction of that color. To me, it looks more like the retired color, Lost Lagoon (which I do miss terribly!). 

Mr. Hummingbird's color is quite muted in the photo. My embossing doesn't show up much.

What a whiner, huh?

In a new stamp set, Humming Along, found in the Occasions Catalog on page 36, are several lovely images. My very favorite is the hibiscus -- I have been in love with this flower forever. You will see that image in a card coming up on the blog very soon.

But, the hummingbird is also wonderful. And he's so big. And he's line art. And he begs to be stamped onto patterned paper. 

Deciding to do just that, I was digging through my scraps of leftover DSP to find patterns that would work well with my feathered friend. Tucked amongst all the small scraps was a piece of some glossy cardstock that I had used with Brushos awhile ago. The size of this piece was just right for Mr. Hummingbird.

I stamped the image onto several pieces of the DSP, as well as the Brusho background. Immediately, after seeing him stamped on the glossy Brushoed cardstock, I decided to fussy cut him and use him as the star of a card.


Since the bird himself was fairly busy -- Wait! Aren't hummingbirds always busy?? Oh! busy as in a lot going on in the design on the bird. Anyway, I wanted to keep the rest of the card simple so he could be the star focal point.

I know it doesn't show up in these high quality photos, but I embossed the oval on which I adhered the bird with flowers. The Bermuda Bay 4" x 5 1/4" mat has been embossed with the elegant Subtle Embossing Folder (page 223 of the Annual Catalog). 


Since I used the same Bermuda Bay, although un-embossed, for the larger oval surrounding the hummingbird, I wanted to distinguish a little more between the oval and the background, so I used Stampin' Dimensionals to pop it up.

I also put a slight Bermuda Bay mat around the sentiment that was stamped in black on Whisper White, once again to echo the nuances of the oval focal point, and I popped "Happy Birthday" up with Dimensionals too.

So, the card has some dimension, but not enough to warrant having to put additional postage on the envelope to mail it.


To finish off the card without too much added fuss, I placed pale turquoise sequins 
in the centers of the embossed flowers surrounding the bird.


Sweet and simple, I like how the card turned out. 
With a change in sentiment, it could be used for any of a number of occasions. 
I love that kind of card!


Busy
Smiles.

January 15, 2019

STAINED GLASS IRIS

When I'd first received my order of the Graceful Glass 6 x 6" Designer Vellum (page 165 in the Annual Catalog), I cut apart the pieces so they could be used individually on cards. 

A set of four stained glass looking panels came on a single sheet, making each of the panels about 1 1/2" x 6". This an odd size, especially if you want to keep the card size to the traditional A2 size of 5 1/2" x 4 1/4". 

Since I wanted my card to fit inside an A2 size envelope, the 6" length was too much. I (gulp) trimmed off 1/4" at each end, making the panel 1 1/2" x 5 1/2". 

Since the "stained glass" panel was so narrow, I added it to a piece of Highland Heather cardstock that measured 1 3/4" x 5 1/2", just to give it a bit more weight.

Using adhesive on vellum is always tricky, mainly because the adhesive somehow shows through the vellum once it's in place. The trick that I used on my card is a simple, but effective, one. I simply put a few Mini Glue Dots in strategic places, i.e., where there was coloring. I was lucky, because the coloring itself hid the dots enough that they were almost invisible.


I wanted to keep the card fairly simple, with the colored panel as the focal point. To somewhat echo the graceful lines of the iris leaves, I embossed a 3 1/2" x 5 1/2" piece of Whisper White cardstock using the lovely Layered Leaves 3D Dynamic Textured Impressions Embossing Folder, found on page 222 of the Annual Catalog. 

Wanting the leaves to be embossed and simply present, I decided to NOT spritz the paper first with water before embossing, which would give it a deeper, more prominent design.


A close-up of the coloring and the embossing:


To color in the image, I used Stampin' Blends on the front side -- the side of the vellum that appears to be embossed and raised. 

After the image was colored and adhered to its narrow purple mat, I popped it up against the embossed background with Stampin' Dimensionals.

If desired, it would be simple and effective to add a small sentiment anywhere along the right side of the embossed piece. I opted to leave it sentiment-free.

Speaking of the "right side of the embossed piece", my original intent was to center the colored portion against the embossing. When I held that up, it looked much too boring and stagnant. After moving it around a bit, I liked that, by putting it quite a bit off center, it seems to add a little surprising element of freshness.


After adhering the embossed piece to a Whisper White card base, 
the final card measures 3 3/4" x 5 1/2", a very pleasing size.


Have you ever colored on vellum? Did you use Stampin' Blends to do so? If not, what medium did you utilize for the coloring process?

Just a note: It is entirely possible to do the coloring on the reverse, or "wrong", side of the piece. The end result, however, would be much more subtle. So, if that's the look you're going for, by all means, flip it over and do your coloring! Both methods are RIGHT!

Stained
Smiles.

January 12, 2019

BASKET WEAVE FLOWER


This is a card that my attendees created at one of my fall Stamp-In Workshops: 


By doing just one additional little step, it is possible to make this basket weave look even more beautiful and realistic than without the step.


Following you will find the tutorial for re-creating a card like this:

SUPPLIES:
Soft Suede cardstock
Very Vanilla cardstock
Old Olive cardstock

Mango Medley ink
Pumpkin Pie ink
Soft Suede ink
Early Espresso ink
Crumb Cake ink

Painted Harvest stamp set (page 139 in the Annual Catalog)

Big Shot
Basket Weave Embossing Folder
Stitched Shapes Framelits
Beautiful Layers Thinlits (page 215 in the Annual Catalog)
Paper Snips
Stampin' Dimensionals
5/8" Burlap Ribbon (page 200 in the Annual Catalog)

INSTRUCTIONS:
Fold a 5 1/2" x 8 1/2" piece of Soft Suede cardstock in half, creasing it well with a bone folder.

Open the Basket Weave Embossing Folder. Rub Crumb Cake ink directly from the pad over the inside of the folder on the side that has the writing. Carefully add a 4" x 5 1/4" piece of Very Vanilla cardstock to the Embossing Folder, making sure it is straight, close it, and run it through the Big Shot. This will add a bit more dimension to your embossed piece. Adhere this piece to the card base.

Make a doily-like frame with the die from the Beautiful Layers Thinlits and a piece of Soft Suede cardstock. Use the poky tool to remove the fragments from the edges of the piece. The rest can stay in as they will be covered by the green circle.

Using the Stitched Shapes circle die, cut a circle from Old Olive cardstock. Adhere this to the doily shape. Set it aside for now.

Stamp the flower onto Very Vanilla cardstock, using the lighter orange for the solid color, followed by the more detailed stamp in Pumpkin Pie. Add the center in Soft Suede, and then the dots stamped in Early Espresso. Fussy cut the flower, leaving Very Vanilla edges all around. With a Stampin' Dimensional in the center of the flower, adhere it to the green circle.

Take a piece of the Burlap Ribbon, fold it in half, and attach it to the back of this focal piece with a piece or two of tape so it is secure and lying pleasingly. Trim the ends of the burlap at an angle.

Use a couple Stampin' Dimensionals to add it to the card base, being careful not to add Dimensionals over the ribbon portion, since that is already so thick.


Realistic
Smiles.


January 8, 2019

SKATERS WALTZ

Do you remember the Christmas Challenge I'd set for myself in the weeks leading up to Christmas whereas each day I would randomly grab one of my holiday stamp sets and make a card using at least one stamp from it? And then I got sick right at the end and was unable to do the cards for the two remaining sets?

Well, yesterday I was doing a <very> little clean-up in my Creation Station, and came across those two lonely -- ignored -- sets. One of them contained all Christmas tree stamps, so that will get packed away.

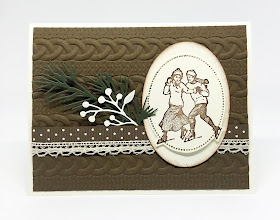
The other one, however, had an image that was strictly cold weather-related. So I decided to make a card using that one stamp. Here it is:


I added some charming winter-y details. The Cable Knit 3D Dynamic Textured Impressions Embossing Folder (page 222 of the Annual Catalog) lent itself to a cozy sweater look for the background. I also added some retired lace and ribbon, as well as a few winter foliage diecuts.


I attached the foliage only at the bottom of it and left the rest of it loose 
to add more dimension without the bulk, which makes it ideal for mailing.


A close-up of the image from the Christmas stamp set, 
stamped in Soft Suede to give it a somewhat old time-y look.
I fussy cut the stamped oval surrounding the skaters, but, 
since the skates fell outside the dotted line, I fussy cut them as such. 
I love the look.


Since I didn't add any kind of sentiment to the card, it could be used for so many different occasions. Probably not Fourth of July . . . 

And so the Christmas Challenge comes to an official end. Hope you enjoyed the journey. I did!

Waltzing
Smiles.

January 5, 2019

MY 2019 CALENDAR

In the past years, I've made calendars a few of those years. They are very labor and time intensive. So, if life is just too overwhelming, I don't end up making calendars.

This year, however, Stampin' Up! released a super cute stamp set called In Every Season (page 46 of the Annual Catalog) that begged to be made into a calendar. It is a set of 12 flower stamps that seem to be Flowers of the Month. Online there was a lot of confusion amongst Demonstrators as to what each flower was and which month it represented. Some of them were easily apparent. Others, not so much.

Anyway, as soon as I saw this set (before I was aware of all the confusion), I decided then and there that I would be making calendars this year, so I ordered it. Once it was calendar making time, I was faced, however, with figuring out some of the flowers/months.

Through extensive research, I finally accomplished this. As I introduce each month's page, I will add the flower's name. 

Before I introduce 2019 to you, I want to explain a little bit how I did these calendars. 

First of all, I decided on a total of eight calendars. I'm glad I didn't go with any more because these eight took me a few weeks to finish. 

Initially, I stamped each flower eight times in Memento Tuxedo Black ink on Whisper White cardstock. Keep in mind that 8 times 12 is 96. Yes, 96 flowers!

After the 96 flowers were stamped, it required a little more research so I could color each flower in its proper colors. I did the coloring with Copic Markers (I would have loved to have done the coloring with Stampin' Blends, but I didn't have enough of a variety of colors/shades to do the job correctly.) 

Once the 96 flowers were all colored, I fussy cut them, leaving a bit of white edge. Look at the size of these flowers -- imagine fussy cutting them! Some months were quite challenging, even leaving the white edges.

I printed out calendars from the Internet onto copy paper and carefully cut them apart by hand with scissors. I cut white cardstock to 3" x 4". I added each month page at the bottom of the cardstock piece. 

My intent was to just add the fussy cut flowers above the month. When I did that, they got completely lost. I debated for quite awhile as to how to alleviate that situation.

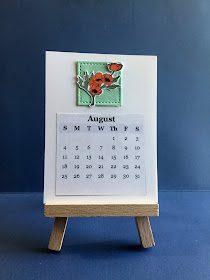
I finally came up with mounting them to a 1 1/4" square of lightish green, cut with the Stitched Shapes Framelits (page 220). It took quite a long time to die cut 96 little green squares. I had decided that for uniformity's sake to make the square the same color throughout the entire year.The green I chose was one that went well with all the shades of green in the foliage of the flowers.

Then I had to adhere the flowers to the squares. I liked the fact that the squares were a bit smaller than the flowers, allowing portions of each flower to extend beyond the box of the square.

Then the squares needed to be adhered to the top part of the 3" x 4" piece.

There! I had a January done! Only 95 more pages to go!

OK. Here we go:

January, Carnation


February, Violet


March, Jonquil


April, Tulip


May, Lily of the Valley


June, Rose


July, Water Lily


August, Poppy


September, Morning Glory


October, Calendula


November, Chrysanthemum


December, Poinsettia


I decided to go with small wooden easels to display the calendars. The entire year sets neatly on the ledge of the easel, and each passing month can simply be slipped to the back of the pile.

Relief once this huge project was completed. 

Annual
Smiles.


January 1, 2019

TOP NINE 2018

I had wanted a Smartphone for such a looooong time. The reason I'd wanted one so badly is that, as an avid photographer since the age of nine, I wanted to participate in Instagram. 

I finally got myself an Android a couple of years back. Last October, when that went kaput, I splurged on an iPhone, which I love dearly.

So, as soon as I had my greedy little hands on my Android, I, of course, glommed on to Instagram. 

Since joining in, I have tried everything in my measly non-tech power to succeed on this platform. I even took classes on this topic. All to no avail, however. Much to my chagrin. 

As of right now (I just checked), I have posted 910 photos to Instagram, and I can boast a whopping 504 followers. (I, on the other hand, follow 824 people.) I am thrilled when I can get more than 20-30 likes on any given photo. Which is truly pathetic. 

It's embarrassing. Really. 

Anyway, with my daughter, Emily's, help (who has an incredible 6,408 followers!!! https://www.instagram.com/emilybluestar/), I managed to compile my Top Nine of 2018. Top Nine means the nine posts that received the most likes throughout the year. 

My Top Nine of 2018 is shown below:


Top row, left to right: the chicken I drew (48 likes!), some coleus leaves (45 likes), dead oak leaves wedged in the cracks of our deck (42 likes), second row: a blooming amaryllis (41 likes), a card I created for my girls to create at one of my Stamp-In Workshops (41 likes), some of my Gelli prints (40 likes), third row: three close-ups of flowers at Olbrich Botanical Gardens in Madison, Wisconsin (40, 39 and 38 likes respectively). 

I guess it's a nice representation of the types of photos I post, from drawings, to prints, to greeting cards, to close-up photography of nature subjects. The topics that I truly love.

If you would like to follow me on Instagram, this is the link to my account. I would love and be honored to be followed by you!

Fingers crossed that my Top Nine for 2019 will be even better.

Top
Smiles.