Yesterday, sitting in my Creation Station, with nothing really pressing to on the docket, I decided to do a little experiment. And it worked!
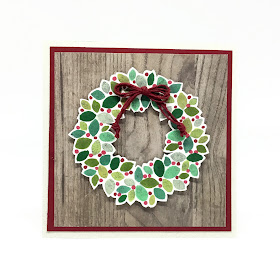
The 4 1/4" square card shown below is the result of this experiment. Just what was so experimental about this ordinary looking card you ask?
The wreath in this beautiful old set consists of several steps. The first step is the bulk of the wreath. A second layer adds additional leaves to make it look more three dimensional, while the final step is a stamp that adds the berries to the wreath. Little tabs at the tops of each of the stamps help you in making sure each of your layers is aligned nicely.
Then, if you have the coordinating die set, you can simply die cut your wreath, and the bow that you stamped separately, if you chose that option.
I only have the stamp set, so in the past, if I've wanted to use the wreath, I needed to go through all the steps, then fussy cut it. Otherwise, I could just stamp it onto the surface on which it was going to be used, so then there is no need for cutting.
Well, yesterday I was in the mood to use my Stampin' Blends. But the leaves on this wreath are solid, not line art. So, here's where the experimenting comes in.
Shown below you can see my first step. I inked up the base stamp (the only stamp I used in this card) with Memento Tuxedo Black Ink and stamped it off first on my scrap paper, the wreath shown to the leaft. I then stamped it again -- without re-inking -- on a piece of Whisper White cardstock. The resulting image is the wreath shown to the right. Three of the leaves have already been colored in, just to see if it was going to work.
I used seven green Stampin' Blends -- those shown below -- to randomly color in the leaves until the wreath was completely colored in. I'd wondered if coloring over a lightened black -- or a gray, once it is stamped off -- would result in bright enough looking leaves. Well, wonder no more. It works.
To add the berries I randomly added dots of Light Cherry Cobbler and Dark Cherry Cobbler Stampin' Blends.
As you can see, the leaves turned out very well, not too subdued at all, as I had feared they would be.
As I noted previously, I do not have the dies to cut this wreath out.
The photo below shows the wreath lying upon its bed of Blends all fussy cut.
At this point, I was happy with my wreath. But I wanted to do something further with it. Even though the stamp set comes with a stampable bow to adhere to the wreath, I wanted a more realistic bow for my wreath. To make my bow, I used three lengths of Cherry Cobbler baker's twine that I've had for some time and tied a bow. I used a Glue Dot to attach it to my wreath.
A closeup of the colored and fussy cut wreath with its Baker's Twine bow:
I know I constantly say this, and you probably wonder why I don't do something to alleviate the situation, but the colors in my photos don't quite do it justice. It is much more vivid than is portrayed here. You are all aware of the true depth and richness of Cherry Cobbler. Picture that.
I was so pleasantly surprised at the success of my experiment! I have discovered, through this very scientific process, that if you stamp off a solid stamp before stamping it onto your desired cardstock, it is very possible to color it with Stampin' Blends. And it was very easy to do! Give it a try sometime with a solid stamp you have.
Have I mentioned that I simply adore the Stampin' Blends? I now possess all the colors in which they are available -- as of yesterday, when I got my last three pairs. I have been using Copic Markers for years -- in fact, I have more than 200 of them! -- and, while I love them, I actually think the Stampin' Blends are more fun to play with. And I am always so happy with the results.
Experimental
Smiles.


These are just beautiful! It's been a while since I got my stamping stuff out -- will have to get going on my Christmas cards. Thanks for the inspiration!
ReplyDeleteThanks! Good luck and have fun with your Christmas card making!
DeleteThat is just beautiful! I would not have thought the markers would color so well over faded black ink (for lack of a better term). Pinned.
ReplyDeleteThanks! I know! I was so pleasantly surprised that it actually worked -- and looks good too!
DeleteLove the wreath. So pretty!
ReplyDeleteThanks so much, Veronica!
DeleteWhat a great idea, don't you love it when an experiment works out well ?
ReplyDeleteThanks, Julie. Yes, I do!
DeleteThe layers really make it quite beautiful!
ReplyDeleteWowwww. Just beautiful!
ReplyDelete#wonderfulwednesdaybloghop
Aw, thank you so much, Jennifer!
DeleteSo pretty! Thank you for sharing at The Really Crafty Link Party. Pinned!
ReplyDeleteThank you, Teresa!
DeleteSo beautiful. I have not heard of Stampin' Blends. Pinning this!
ReplyDeleteThank you for linking up with us at Creative Muster! Many blessings to you xoxoxo Sharon
Thank you, Sharon! Stampin' Blends are the Stampin' Up! version of an alcohol based ink marker, similar, but much less expensive, to Copic Markers. They are wonderful to work with.
DeleteAnother beautiful project!
ReplyDeleteThank you thank you!
Delete