I wanted to use my Stampin' Blends to color a Christmas ornament in very nontraditional colors. I think of blues and purples as sort of nontraditional -- normally I would dig out the reds, greens, yellows -- for a detailed ornament.
The ornament that I chose to color is a stamp set from last year. I truly love this set, so -- no surprise! -- I will continue to use it.
I stamped the large ornament from the set in Memento Tuxedo Black Ink, then went to work with my Stampin' Blends. In case you're interested, following are the colors I used: Highland Heather, Seaside Spray, Mint Macaron, Balmy Blue and Shaded Spruce.
After the coloring was finished, I added a coat of Wink of Stella over the entire thing. I adhered it to a slightly larger white circle, then tied a bow in pretty silver cord and used a Glue Dot to attach it to the top of the ornament.
In the Holiday Catalog, there is such a pretty embossing folder that I missed the first several times I paged through the catalog. When I finally discovered the Stylish Scroll Embossing Folder on page 53, I needed to have it. Not having used it yet, and wanting to add a little classy texture to the background, I ran a 4" x 5 1/4" piece of Balmy Blue cardstock using it through the Big Shot..
I added this pretty background to a card base of metallic silver cardstock. The circle/ornament combination was fastened to this with Stampin' Dimensionals.
The best closeup I could get to show what the shimmer
from the Wink of Stella adds to the ornament:
Once I had the ornament in its place on the card, I wasn't sure how to finish it all off. Before adhering the embossed cardstock to the card base, I stretched a piece of white/silver ribbon to the lower portion, taping the ribbon ends to the back.
THEN, I had a brilliant idea for the sentiment. On that same page, 53, in the Holiday Catalog, hiding amongst all the Halloween stuff, is that wonderful Ornate Frames Dies set. Yes! I would use one of those dies to echo the swirls from the embossed background. After stamping the sentiment in VersaMark ink, then sprinkling it with silver embossing powder, I heat set it. Then I cut the sentiment out with the scroll-y die that you see below. I used a couple Mini Stampin' Dimensionals to adhere it over the ribbon.
I was quite pleased with the way this card turned out. The elegant embossing in the background is perfect with the ornament. But . . . as I was looking at the embossed background, I had a flash of light.
A little experimenting was done with VersaMark ink and the embossing folder. I carefully added VersaMark ink to the inside of the embossing folder on the side with the raised image. Gingerly placing a 4" x 5 1/4" piece of Balmy Blue cardstock into the sticky folder, I ran it through the Big Shot. Immediately I sprinkled this sticky embossed piece of cardstock with silver embossing powder.
There was plenty of work to do at this point, however. Although I had liberally rubbed my Embossing Buddy over the cardstock before putting it inside the embossing folder, there was LOTS and LOTS of stray embossing powder that needed to be painstakingly removed with a small paintbrush. This took quite some time, maybe ten minutes of patience, before I could actually use the Heat Tool to heat set my experiment.
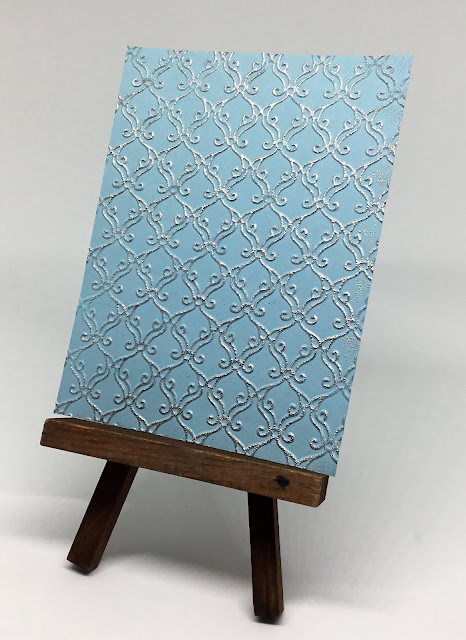
The lovely results of this experiment can be seen below:
While I was thrilled with the way the first one turned out, I had it in my head that I wanted the RAISED portion of the embossing to be silver. But, how to do that?
A little more experimenting was called for here.
First, I put a 4" x 5 1/4" piece of Balmy Blue cardstock inside the embossing folder and ran it through the Big Shot, exactly as I did for the card I made.
Here is the difference though: I oh so gently tapped the VersaMark Ink onto the raised portion of the embossing, directly to the cardstock. I mean REALLY GENTLY. You don't want any of the sticky ink to go beyond the raised portions of the embossing because that would be defeating my experiment's purpose: I only wanted the raised portion silver.
Once I had the cardstock inked up, I sprinkled it with silver embossing powder. I then went through the paintbrush and blowing procedure. Whew. After I had any stray embossing powder removed, I used the heat tool to heat set my embossing.
The result of the second experiment can be seen in the following photo:
My Stamp-In attendees will probably never be expected to do either of these last two embossing techniques due to its time consuming nature. But I love to know that they both worked, with lots of effort, so I will file the idea away in my crowded brain for future reference.
I am always pleased when a harebrained experiment works. Are you very experimental in whatever you do?
Glad
Smiles.


Love the silver ink and embossing experiment. It turned out very elegant.
ReplyDeleteThat is so pretty and I just love how it sparkles. I also think that silver embossing looks fantastic too. You have the best ideas! Pinned.
ReplyDeleteAw, thanks! You are always the sweetest!
DeleteAbsolutely gorgeous! I love the non-traditional colors.
ReplyDeleteThank you so much, Michelle!
DeleteWhat nice details!
ReplyDeleteThank you!
DeleteWow! This is so beautiful. #MMBC
ReplyDeleteThank you, Catherine!
DeleteThat's lovely and well done for getting a photo that really shows that shimmer !
ReplyDeleteHeh! Thanks, Julie! It was a tough one.
Delete