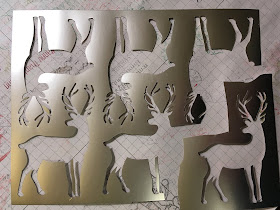
Do you remember a few posts back when I featured a card I made with detritus that was supposed to be thrown away? In Wasted Snowflakes, I told you about the most recent Paper Pumpkin kit I'd received. After punching out all the elements to set aside for a later date, I was left with other waste products besides the cute snowflake "stencil" I used in Wasted Snowflakes. They are pictured below.
In one of my responses to a comment elicited by the post, I mentioned that I may try to do something with the deer next.
See the deer in the photo below?
Well, this is what I finally came up with using the deer "stencil":
Because the deer were so mashed together on this sheet, it would have been impossible to work with just one of them. In order to get one to work with, notice how I cut the lower right one free from the rest, trying to preserve as much of the paper surrounding it.
I had planned to use Sponge Daubers to do my inking. However, it would have been so easy to be over zealous and ink beyond where the deer was. So, I used Post It Note tape close to the danger zones to avoid doing this, as well as for holding my stencil in place while I worked with it.
Since I wanted my deer to seem to be out in the winter elements, I chose a very old piece of Designer Series Paper that boasted a swirly design that simulated snowy conditions that a deer would experience during the winter -- at least, here in Wisconsin. The design in the DSP was faint enough that my stenciled deer in Soft Suede covered up the swirls underneath the deer.
Being super careful in my inking, I was pleased with the final result:
After accomplishing this, I let it sit for a few days. I couldn't decide where to go with it from that point.
Finally, it bothered me enough that he was feeling so forgotten that I decided to go back to work on him.
My first step was to cut the DSP and deer into an oval. I added a larger oval to that in Shaded Spruce.
Not sure where to then proceed, I searched through my seasonal stamp sets for the perfect element to incorporate into the composition.
I came across this sprig of holly from a retired set. After stamping the sprig twice in Memento Tuxedo Black Ink on Whisper White cardstock, I used Stampin' Blends to color in the leaves and berries. Then came the fussy cutting. To make the cutting a bit easier, I left a narrow white margin all around.
After adding the holly branches on either side of the lower part of the oval, I tied a pretty bow to finish it off.
A 4" x 5 1/4" piece of Pool Party cardstock was added behind the Shaded Spruce oval, since that was the closest current color I had to coordinate with the color in the DSP. In some lights, it looks great. Other lights, not so much.
A Whisper White card base completed my experiment with this majestic deer.
I am so pleased that another of my weird experiments worked. Another example of "don't throw anything away -- it is a possible art supply"!
When I started to write this post, since I called my first one Wasted Snowflakes because I was using something as a stencil that someone else may have considered waste and thrown it away, I thought it would be appropriate to title this post Wasted Deer. That's how I saved all my photos, so that's the title I went with.
Once I started writing, however, ding ding ding inside my brain. The title turns out to be not so cute. If you aren't already aware, there is an affliction that affects white tailed deer called Chronic Wasting Disease (CWD). Now, I feel bad.
Smiles.


That is a beautiful card; and I had no idea there was actually an affliction for deer called wasted. Pinned.
ReplyDeleteThank you!
Deletelove the card ,,, like you I love reusing things that others may not find any use in
ReplyDeletecome see us at http://shopannies.blogspot.com
Thanks so much! Yes, it's one of my favorite things to do -- find new uses for things that would normally be thrown away.
DeleteLooks great! I don't like to waste either. Such a great idea!
ReplyDeleteThanks for visiting Wonderful Wednesday hop
Thanks! I'm glad you like it.
DeleteI love your great instructions and what a beautiful card! It looks so soft to the touch. Happy Holidays! - jen
ReplyDeleteThank you, Jen!!
Deleteit's beautiful, thank you for sharing at The Really Crafty Link Party. Pinned.
ReplyDeleteThank you, Teresa.
DeleteWow Linda! Another fantastic creation! And with something that would have ordinarily been thrown away. I am impressed with your innovative-ness!
ReplyDeleteMichelle
http://mybijoulifeonline.com
Thank you, Michelle! You are so sweet!
DeleteWow! You do some amazing things with paper, my friend! Thanks for sharing at Tuesday Turn About... the party returns from the Christmas break this Tuesday, 1/7. Hope to see you there, and Happy New Year!
ReplyDeleteThanks so much, Julie! You are so sweet.
Delete