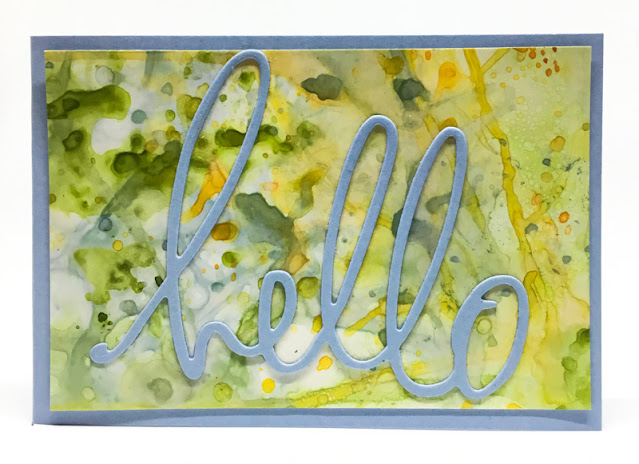
I got this really cool "hello" die recently. As soon as I opened the package and discovered a very bold sentiment, I was immediately driven to use it in a card. I love the font and decided that I would make it the most important part -- the focal point -- of my card. Or as it turned out, cards.
What I needed was a background that was interesting in and of itself, but not so interesting that it would overshadow my basic statement.
I love making backgrounds in a random, uncontrolled, way. So I grabbed a quarter sheet of glossy cardstock and went to work with some Stampin' Up! inks. I used Mango Melody, Seaside Spray and Granny Apple Green for my color choices.
I ended up trimming the single piece of finished background so I got enough for two small cards. These diminutive cards measure 3" x 4 1/4".
Using the Seaside Spray cardstock for the card base for both cards, I simply switched the color of the word from Seaside Spray to Mango Melody for the second card.
Doing backgrounds like this is, as I said previously, very haphazard and impossible to predict what the finished product will look like. To me, that's what makes it fun.
I actually had the presence of mind to take a few photos of my process as I was going through it.
The first photo below shows how I simply squished the three colors of ink directly from the ink pad to the craft sheet.
The next step was to spritz each one with a mist of water until bubbles form. If you add too much water, the color will be extremely thin and not show up too much on your paper. This is especially true if you are using glossy cardstock, as I was doing.
The Granny Apple Green ended up being quite intense, so I spent a lot of time trying to balance the colors as well as I could.
To get started, dip the glossy side of the paper into a color in a few spots. Continue with the other colors. If you want a more definitive look, dry the paper in between each color with a heat tool. Then they don't blend together as much.
As the original puddles of ink start to get used up, you are left with little more pronounced dots of color. Those are my favorites! Look at the first card photo and you can see the little dots of color more than in the second photo.
When picking up ink, you can even bend the paper to grab ink in selected areas. Keep examining what you have so far to determine which areas need a little more work.
The long streaks of color result when you tilt the ink on the paper as you are heating it. Not my favorite, but if you can get them to crisscross each other a few times, it can provide an interesting look.
My final result is shown in the last photo. Often the inks will tend to puddle at the edges. Sopping it up with a corner of paper towel works to some extent. My solution for that is to simply cut your cardstock a little bigger than you want to end up with, and just trimming off the undesirable edges.
Another consideration to be aware of if you want to make a background using this technique is to be sure to select colors that play well together. I know I've said it before, but if I would have thrown a red, for example, into this mix, I would have gotten much more of a brown result in areas.
There you have it. I hope I've given you some good tidbits of advice for creating a background such as this. It just takes a lot of experimentation and willingness to accept what results, or, if not, to continue to work on it until you are happy.
Messy
Smiles.


Love what you have done here! Super cards!
ReplyDeleteWhy, thank you so much!
DeleteSo clever, love these cards! :) #mischiefandmemories
ReplyDeleteAw, thank you!
DeleteI love the unpredictable background. Very artsy. Pinned.
ReplyDeleteThanks, Joanne! That's what I love most about this technique also.
DeleteLove this! Thanks for sharing your creativity!
ReplyDeleteThank you so much, Marielle!
DeleteThese look great! So bright and cheery and really unusual looking. I might have to try this out on my next art project with the kids (plenty of time on our hands in lockdown!) #MischiefAndMemories
ReplyDeleteThanks! Yes, this would be lots of fun to do with the kiddos! Enjoy!
DeleteThey look lovely. I would be very happy to receive one. #mischiefandmayhem
ReplyDeleteThank you, Claire!
DeleteWhat a great technique, I love the colours x x #MischiefAndMemories
ReplyDeleteThanks, Dana! Give it a try sometime!
DeleteI love that 'hello' too. It's perfect for a card full of happiness. What pretty card ideas. Thank you for bringing lots of creativity to #MischiefAndMemories this week.
ReplyDeleteAw, thanks, Annette!
DeleteLove the splodgy wonderfulness #MischiefandMemories
ReplyDeleteThanks! And I love your word, "splodgy"! It's a keeper for sure!
DeleteLinda, I really like the colors and technique you used in the back ground. A lovely large die indeed !
ReplyDeleteThank you for sharing with us at Meraki Link Party.
Have a wonderful week.
Naush
Why, thank you so much, Naush!
DeleteThis is a very happy and cheerful card and such a sweet message for any time. Glad you shared it. #HomeMattersParty
ReplyDeleteThanks so much, Donna. I'm so glad you like it!
Delete