Navigation Bar

December 28, 2021

PEACEFUL SNOWFALL

Here in Central Wisconsin, we are enjoying a very peaceful snowfall as I write this. If winter could be like this all the time -- beautiful gentle snow falling down, but only on the grass and tops of houses, not the roads -- it would be quire endurable. But, no, that's not how it goes. 

With those current conditions, I thought this would be a good card to share with you all today. 


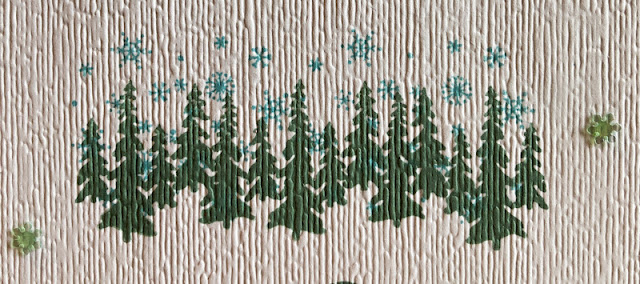
I used the line of evergreen trees stamp, as well as the snowflake stamp, from a recent Paper Pumpkin kit. This scene is exactly what today feels like. 


A close up of the trees and snowflakes. Take note of the deep texture of that piece of the cardstock. Stamping onto a texture like that never works. If you want a textured background, stamp it FIRST, then run it through your embossing machine. Perfect every time!


Here is a share of a tutorial on how to create a card similar to this one. If you live in Hawaii, or someplace else without winter weather, poor you. Just kidding. You are fortunate! But I still send you peaceful wishes, even though you may not be able to relate to a scene such as this one.

SUPPLIES:
White cardstock
Balmy Blue cardstock

Soft Succulent ink
Balmy Blue ink

Stamps from Peaceful Christmas Paper Pumpkin
Peaceful Wishes (sentiment - retired)

Die cutting/embossing machine
Scalloped Contours dies (page 158, Annual Catalog)
Subtles Embossing Folder (unfortunately retired)
Snowflake sequins
Stampin' Dimensionals

DIRECTIONS:
Fold a 5 1/2" x 8 1/2" piece of white cardstock in half, creasing it well with a bone folder.

From white cardstock, using the die from the Scalloped Contours dies that measures 3 1/4" x 4 1/2", cut a scalloped mat. Towards the top of this piece, in Soft Succulent ink, stamp the row of evergreens from the Peaceful Christmas Paper Pumpkin kit. Follow with the snowflakes from the kit in Balmy Blue, stamping over the trees and a bit above them. Flip the stamp 180 degrees with each impression you make so it isn't a boring line of snowflakes.

In Soft Succulent ink, stamp the sentiment towards the bottom of the scalloped piece.

Emboss the finished scene with the Subtles Embossing Folder.

Add the scene to a piece of Balmy Blue cardstock that measures 4 3/4" x 3 3/4".

With Stampin' Dimensionals, add this to the card base.

Finish by adhering three snowflake sequins.

Snowy

Smiles.


December 24, 2021

WARM CHRISTMAS WISHES

 WISHING YOU ALL 


Christmas
Smiles.

December 21, 2021

JOYFUL CHRISTMAS WISHES

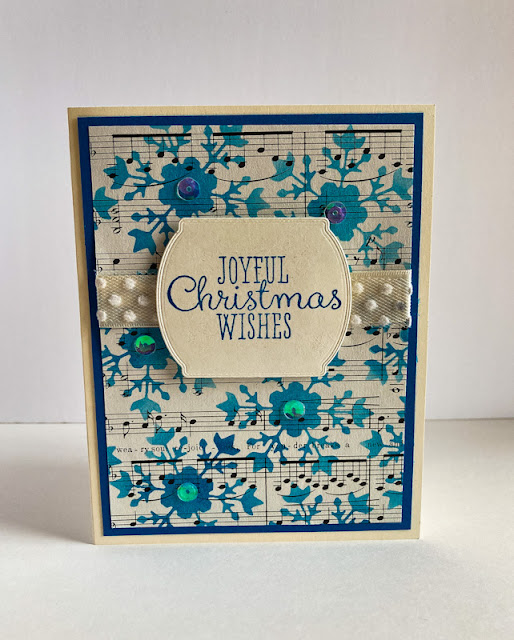
I love combining the beauty of music with  my cards on occasion. I was lucky enough to discover an old book filled with Christmas carol music. I know a lot of you would not approve of my actions, but, I did remove some of the music pages from the book to use in cards. Tsk tsk. 

After cutting the music to a 3 3/4" x 5" size, I stenciled snowflakes in Pacific Point ink across the musical score. I'd made a stencil using one of the pretty snowflake dies from the So Many Snowflakes dies set, and this is what I sponged through to create my stenciled look. I was careful not to overlap the snowflakes. However, I wanted them as close together as possible to fill up the musical space.


Adding a little ribbon, a few sequins and an appropriate sentiment gave me a finished look without being bulky. Also, keeping the color scheme tp only two colors, with the addition of the musical notes and markings, makes it even more effective.

I used Very Vanilla instead of white cardstock since the music itself had something of the patina of age.


A close up of the fun parts of the card:


Following is a tutorial on how to create a card similar to this.

SUPPLIES:
Very Vanilla cardstock
Pacific Point cardstock
Christmas music

Pacific Point ink

Joyful Christmas stamp set (retired)

Die cutting machine
So Many Snowflakes dies (page 165, Annual Catalog)
Tasteful Labels dies (page 166, Annual Catalog)
Stencil made from die
Sequins
Stampin' Dimensionals
Glue Dots
Blending Brush (page 129, Annual Catalog)
2 Very Vanilla ribbons

INSTRUCTIONS:
Fold a 5 1/2" x 8 1/2" piece of Very Vanilla cardstock in half, creasing it well with a bone folder.

To this, add a 4" x 5 1/4" piece of Pacific Point cardstock.

Use one of the dies from the So Many Snowflakes dies to create a stencil from a scrap of cardstock. Using this stencil, move it randomly over a 3 3/4" x 5" piece of Christmas music, sponging through the snowflake opening in Pacific Point, using a Blending Brush or stamping sponge. Continue to do this randomly all over the music without letting any of the snowflakes overlap.

Cut a piece of 3/4" Very Vanilla satin ribbon and a 3/4" piece of the Very Vanilla polka dot ribbon to about 6". Layering the polka dots over the satin, adhere this combo to the snowflaked piece about 1 3/4" down from the top, taping the ends on the back of the piece. Add this to the card base.

In Pacific Point ink, stamp the Christmas greeting onto a piece of Very Vanilla cardstock. Die cut it with one of the dies from the Tasteful Labels set. Add this over the ribbon with Stampin' Dimensionals.

Add a sequin to the center of all the available snowflakes for a little finishing bling.


What are your true feelings about defacing books in this manner? I really am curious. I am an avid book lover and yet I have no problem doing this whatsoever. What does bug me, however, is when people turn over the corners of a page instead of using a bookmark. But a book that has served its purpose I think would appreciate being loved in a new and wonderful way. Thoughts?

Snowflake
Smiles.


December 18, 2021

EMBOSS RESIST POINSETTIAS

It had been quite awhile since I'd done an emboss resist card, and, to be honest, I was hankering to do one for the Christmas season.

I grabbed this pretty retired set with large open poinsettias, figuring it would be perfect for the vision I had in my head. Starting with a piece of white cardstock that measures 4" x 5 1/4", I did one flower at a time, first of all, rubbing the area well with my good old Embossing Buddy (where would we be without these treasures?) I stamped one poinsettia in VersaMark ink, then sprinkled it with gold embossing powder, heating it with my Heat Tool. Once the first flower was done, I moved on to the next one, overlapping the first one just a bit, heat embossing the gold powder. I proceeded like this, flower by flower, until the cardstock was filled with pretty gold embossed poinsettias.


The next step is, for me, the most work. Maybe it's because of the arthritis in my hands, but when I finish a project such as this one, my hands ache for days. But, I love the results, so the ache is worth it once in awhile.This step is the sponging on of ink so the gold embossed flowers can resist the color.

I used one of the Blending Brushes to add these colors in stages: Cherry Cobbler, Mango Melody and Melon Mambo inks. I left some areas on the lighter side, while I darkened others for a nice contrast. For the centers of the flowers, I added a bit of Daffodil Delight.


I angled this shot so you could appreciate the beauty of the gold embossing. 
Isn't that a classy look? 
Heat embossing is still, after all these years, probably my favorite technique.


To finish off the card, I used another old retired die for the label, after embossing the sentiment again in gold. I punched holes in each side of the tag and added gold cord through the holes. Separating the strands for a uniform look, I adhered the cord to the back of the emboss resist piece, popping up the tag itself with a couple Stampin' Dimensionals.

The piece was finally added to a white card base.


Do you often indulge in the emboss resist technique? Do you find it beautiful and satisfying?

Irresistible
Smiles.


December 14, 2021

ORNAMENTS

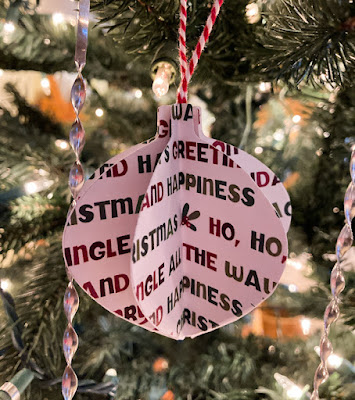
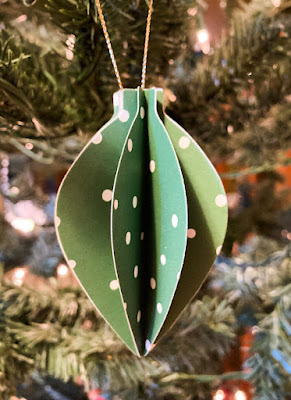
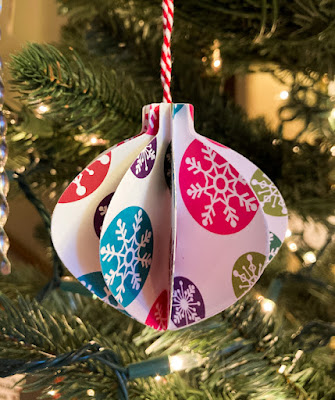
With the Holidays and workshops, I have been spending a lot of time in my Creation Station. Since most of what I've been doing isn't for Creative Therapy's sake, but mostly things that I have to get done, I feel I need to throw in a little "fun" too. So, each day I was down there, I gave myself a break and made a paper ornament. 

I have from several years ago, two Stampin' Up! dies shaped like Christmas ornaments. In the past I have made Easter eggs using oval shaped dies, as well as fall pumpkins using circle dies. Those always turned out so cute, I thought, why not try some acual Christmas ornament-shaped pieces? 

I searched out Christmas-y paper I have in my stash, not necessarily just Stampin' Up! papers. Anything that fit the occasion was fodder for my madness. 

This is the first time we've had a Christmas tree in at least ten years, probably more. You see, our late kitty, Fred (who died in February), loved the ornaments a little too much. He would somehow get them down and EAT OFF THE CORDS that they hung from. So all these disabled ornament would gather under the tree, and I'd have to repair them in order to put them back on the tree, only to have Fred attack them again. I finally gave up.

Now, with him out of the picture (sob!) we have finally put up a tree once again. It is mostly lights, a few metal "icicles" and a handful of ornaments, all paper,  that I've made recently. 

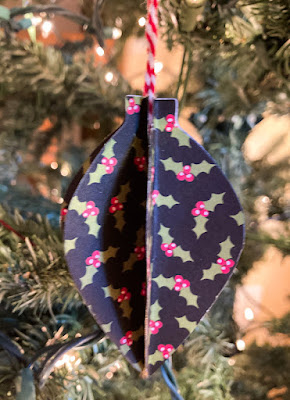
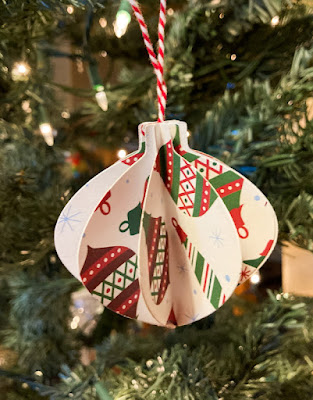
In these <bad> photos, I present to you all nine of the "break time" ornaments I made in the past few weeks. 

At the end of the post, I will tell you how to make ornaments such as these. 

Once again, I apologize for the quality of the photos as our tree is in a weird location with inadequate lighting. But you get the idea.


Wow! What a stunning display, eh? I know they're not all that great, but they make me smile and feel a little happy. 

To make these wondrous ornaments, die cut or punch eight pieces. These can really be done with almost any shape, including circles or STARS! (hey! now I have to go down there again!) I love the star idea! 

Fold each of the eight pieces, with the side you want to show on the ornament on the inside of the fold, in half. I crease each folded piece with my bone folder. Basically you just glue all eight of these pieces together, back to back. It is important that, as you are gluing them together, to match up each of the edges.

Take a length of the cord you want to use as your hanger, fold it in half, and lay it flat down the center of the folded up ornament. Use a piece or two of tape to hold these cord ends in place. 

Put glue on one of the sides, and gently fold the two ends together to make a sealed unit, meeting the two edges as well as possible. 

It seems that no matter how careful I am, I am never able to exactly match up the edges. If this happens to you, do what I do. Take a paper snips and trim off the unruly edges. Then, if it still bother you, you can sponge the edges with a coordinating color of ink. 

They are really very easy to make. If not for the awful arthritis I have in my hands, I probably would just keep on making them, one right after another. But I have to stop after just one.

I hope you are having fun with your decorating, no matter which holiday you celebrate! 

Ornamental
Smiles.


December 11, 2021

SEASON'S BLESSINGS

When a certain stamp set, Season's Blessings, was released, I was immediately enamored with it. I saw it as so versatile, with uses for a plethora of occasions.

My first card with this set, More Positive Thoughts, was the essence of simplicity, but very effective, at least, in my eyes. I loved the play of the leafy branches.

I was anxious, however, to use this set for the Christmas season, creating with the poinsettias in the basket.


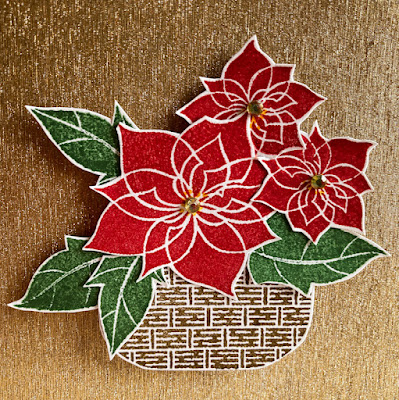
Personally, I really think the one particular product that set off this card beautifully was the glisteny gold paper upon which the basket sits. That is a piece of the Gold and Rose Gold Metallic Specialty Paper, which can be found on page 135 of the Annual Catalog. On my first few forays through the catalog, I completely missed this paper. But, when I did find it, wow! You really do need to see it in person to appreciate its beauty. The photos definitely don't do it justice -- as usual.


A up close and personal shot of the flowers on the glisteny paper:


Following is a tutorial on how to create a card similar to this one. Enjoy!

SUPPLIES:
Gold and Rose Gold Metallic Specialty Paper (page 135, Annual Catalog)
Any Christmas Designer Series Paper
White cardstock

Season's Blessings stamp set (page 94, Annual Catalog)

Real Red ink
Garden Green ink
Soft Suede ink
Dark Mango Melody Stampin' Blend

Paper Snips
Rhinestones
Stampin' Dimensionals

DIRECTIONS:
Cut a piece of Basic White cardstock to 4" x 8". Fold it in half, creasing it well with a bone folder. This will give you a 4" square card. I love this size!

To this card base, add a 3 3/4" square piece of Christmas Designer Series Paper.

Next add a 3 1/2" square piece of the Gold and Rose Gold Metallic Specialty Paper. If you don't have any of this paper, Glimmer Paper can also be used.

On scraps of white cardstock, stamp one of the large poinsettias and two of the small ones in Real Red ink; and the leaves in Garden Green ink. The basket is stamped in Soft Suede ink. Fussy cut these pieces, leaving a narrow white edge.

Make your arrangement atop the basket as you wish, adhering the pieces together so it becomes a single piece. When everything is set and dry, add the centerpiece to the card with Stampin' Dimensionals.

Color three of the small Basic Rhinestones with Dark Mango Melody Stampin' Blends. Add these to the centers of each of the flowers.


How are you doing on making your Christmas cards? How many do you create each year? 

Poinsettia
Smiles.


December 7, 2021

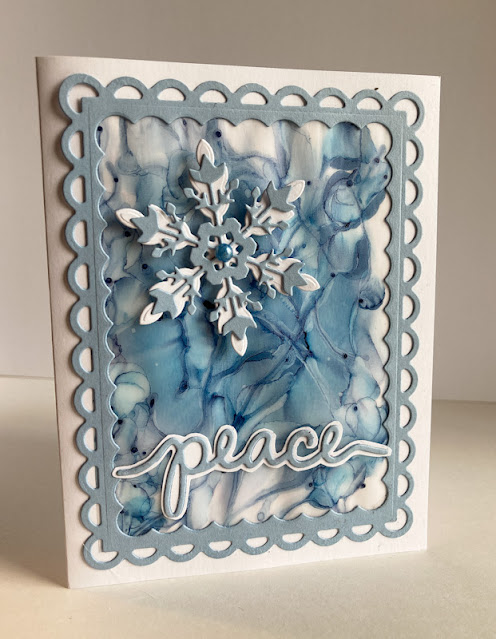
BLENDS AND ALCOHOL SNOWFLAKE

Do you remember back in early October when I introduced to you the experimentiing I'd been doing with mixing together Stampin' Blends and rubbing alcohol? That post and its result can be seen here. My subject matter was a stunning red foil diecut leaf on a background of pinks and reds.

Rather than re-inventing the wheel and telling you <once again> just how to do this technique, just click on the blue "here" for directions on doing it. 


For this card, I used a few Stampin' Blends in blues to create the background on the vellum. As mentioned in the October post, the creator has only a small amount of control when playing with Stampin' Blends, rubbing alcohol and vellum. You think you are working towards a certain effect only to be thwarted part way through. So you end up improvising and being happy with what your results. They are all truly lovely.

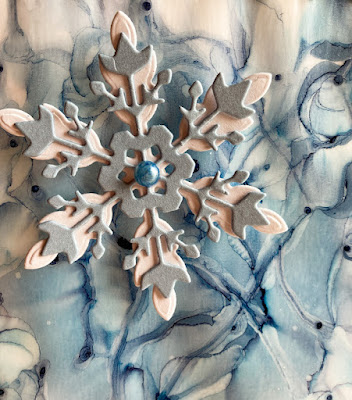
When looking at the closeup below, doesn't it sort of remind you of ink refills and shaving cream?  I really don't know which of these techniques is less messy. But they are both fun and both give good results, so are each worthwhile in their own right.


The dies I used to make the lovely two-layered snowflake are from the So Many Snowflakes die set found on page 165 of the Annual Catalog. I added a Pastel Pearl to the center. To keep it distinct from the busy background, I popped it up with a single Stampin' Dimensional.

The beautiful blue I used in both the snowflake and the frame is the retired Seaside Spray cardstock. I am so sad that color is gone, as it is exceptional for snowflakes and wintry crafting. The frame is done using the Scalloped Contour dies on page 158 of the Annual Catalog. By cutting the vellum to just the right size to fit inside this frame, there is no worry about adhesive showing through. Yay!


Have you given this technique a try? Did you have any problems? Were you satisfied with your results? 


Blended
Smiles.


December 4, 2021

#dailycreating JULY 2021

Below you will find 14 of the drawings from July 2021 that I did as part of Terry Runyan's #dailycreating group, in which we are encouraged to do something creative each day.

Every Sunday afternoon, Terry posts a daily list of prompts for the upcoming week. These prompts are optional, but oftentimes very welcome as a jumping off point if your idea muse has gone on vacation. On occasion, I deviate from the prompts; most time I follow them.

Above each drawing, I will note what the day's prompt was if I followed it, as well as any other pertienent information about the subject if I have it.

#swimming

spotted seal


#frogurday

#bikini day

#vacation

#fashion day
mexican hairless dog

#camelurday

#farm animal

#favorite color
rainbow lorikeet - australia

#beach
dungeness crab

animalurday
echidna - australia

#sprinkles

#owlurday
great horned owl

#thing on thing
himalayan monal

#tiger

Hmmm. In adding the prompts, I think I need to give a bit of an explanation. Terry used to designate all Saturdays as #caturday. Then, for non-cat lovers, she added #dogurday. For some reason, a few months ago, she also added on as an optional prompt #animalurday. So, when you see a prompt followed by "urday", that was my choice of animal or bird to work with that particular Saturday.

Also, I know I've said this in the past, but it bears repeating. Wednesdays are always #thing on thing. Terry almost always draws a head with a cat on top. I have taken it upon myself to consider anything a little extraneous on a bird's head -- tuft, crest, weird hanging things -- as considered #thing on thing. So, that's what I personally always do on Wednesdays.

Just a reminder that these are my personal drawings and not to be copied or used in any way whatsoever without my express consent. I will be happy to make Giclee prints of any of my drawings. Thanks for understanding!

#dailycreating
Smiles.


November 30, 2021

NUTTY SNOWFLAKE

You might be asking yourself, "Why did Linda give this post the title 'Nutty Snowflake'?" You will have to read on to discover my reasoning.

I have been doing a lot of online shopping this season. When a package for my son-in-law arrived, I was annoyed at the multitude of packing peanuts that were in the oversized box. Grrr. I hate those things.

But, wait! They are actually ART SUPPLIES! Yessss!

Look at the background of my snowflake card.


I used a few of those pesky packing peanuts as STAMPS! By picking up Pacific Point ink with the ends of the peanuts, I created my unique background.


I thought my peanut stamped background sort of resembled snow flurries. Yes? So adding a crispy white diecut snowflake to a backdrop of diecut Pacific Point, I added a focal point to the snow storm.


Follow my tutorial to see just how you can upcycle those annoying peanuts in a good, useful way.

SUPPLIES:
White cardstock
Pacific Point cardstock

Pacific Point ink

Die Cutting Machine
Snowflake die
Encircled in Beauty dies (page 159, Annual Catalog)
Pastel Pearls (page 143, Annual Catalog)
Stampin' Dimensionals
Packing Peanuts

DIRECTIONS:
This card measures 4 1/4" x 4 1/4". Take a piece of white cardstock that is cut to 8 1/2" x 4 1/4". Fold it in half, creasing it well with a bone folder.

To this, add a 4" square of Pacific Point cardstock. Set this aside for now.

Cut a 3 3/4" square of white cardstock. Use a styrofoam packing peanut -- yes! A packing peanut! -- for your stamp. Gently dab one end of a peanut in the Pacific Point ink and stamp it anywhere onto the white square. Keep reinking your peanut stamp and continue adding to the white cardstock, leaving a bit of white space between stamps. You don't need to add the snowstorm to the center of the cardstock as that portion will be covered up.

NOTE: Sometimes the peanuts have funky ends. Either turn it to the other end, or choose another peanut to work with.

From Pacific Point cardstock, cut a piece with one of the dies from the Encircled in Beauty dies. 

Using a snowflake die that measures about 3 1/2" in diameter, cut out a snowflake from white cardstock. Use glue sparingly to add the snowflake to the blue background.

Use Stampin' Dimensionals to add the snowflake panel to the center of the nutty snowstorm.

Add a pearl to the center of the snowflake.


Have you ever used a packing peanut as a stamp? What do you do with them when they arrive in a package? 

Nutty
Smiles.


November 27, 2021

THANKFUL BUNCHES

Thanksgiving Day is over, but it's always appropriate to be thankful. So I thought I'd share one more thankful card. But, this one definiately does not have a fall feel.

Are you familiar with Cloisonne? This card reminds me of the cloisonne art form. Click on the link to see what I mean.


The background of this card started out its life as a simple piece of gold printed Designer Series Paper. I colored in all the flowers with Stampin' Blends, leaving the gold showing prominently at the edges.. 

The colors of Blends that I used were: Light Melon Mambo, Dark Just Jade, Dark Mango Melody, Light Cinnamon Cider and Light and Dark Misty Moonlight. 

It took awhile to color in so many flowers, but I think the time and effort were totally worth it.


I decided that, after all that effort, I wanted as much of it to show on the finished card as possible, so I opted for a simple die cut sentiment. Once I cut out the "thankful", I adhered it to a small piece of the gold foil cardstock that I had matted the flowers with. Once it was adhered, I cut around the letters, leaving a nice gold border and added that to the bottom of the card with Stampin' Dimensionals.


This was a fun and completely satisfying project. What are your feelings about coloring a solid piece of printed cardstock? I find coloring with my Stampin' Blends to be so relaxing. And it always turns out so lovely.

Faux
Cloisonne 
Smiles.