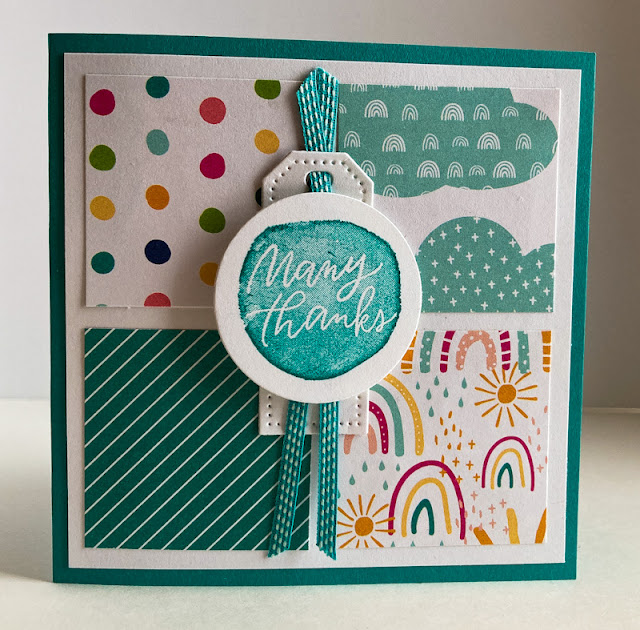
The pack of 6X6 Designer Series Paper, Sunshine & Rainbows, that you can get for free with a $50 purchase during Sale-A-Bration (which ends Monday, February 28!), has the most precious designs.
Because there are just so many cute designs, I wanted to create a card using more than one of them. And shown below is what I came up with. It is so bright and cheery. Don't you agree?
I wanted as much of the designs to show as possible,
so I made my sentiment piece small and unimposing.
Following is a tutorial on how to make this 4 1/4" square card that fits nicely inside a standard A2 envelope.
SUPPLIES:
Bermuda Bay cardstock
White cardstock
Sunshine & Rainbows Designer Series Paper (Sale-A-Bration Brochure, page 8)
Lucky You stamp set (Mini Catalog, page 67)
Bermuda Bay ink
Die cutting machine
Tailor Made Tags Dies (Annual Catalog, page 166)
Layering Circles Dies (Annual Catalog, page 163)
Bermuda Bay ribbon
Stampin' Dimensionals
INSTRUCTIONS:
Fold a 4 1/4" x 8 1/2" piece of Bermuda Bay cardstock in half, creasing it well with a bone folder.
Cut a 4" square of white cardstock. To this, add evenly spaced four 1 3/4" squares cut from the Sunshine & Rainbows Designer Series Paper.
Add this finished portion to the card base.
On a scrap of white cardstock, in Bermuda Bay ink, stamp "Many Thanks" from the Lucky You stamp set. Die cut this piece with a 1 5/8" circle from the Layering Circles die set.
Also from white cardstock, die cut a tag measuring 7/8" x 2 1/4" from the Tailor Made Tags Dies set.
Cut two pieces of a coordinating 1/8" wide ribbon that measure 3 3/4", angle trimming the ends. Thread the two top pieces of ribbon through the hole in the tag so the ends are behind the tag, extending about 1/2" from the top of the tag and letting the remaining ends dangle. Tape them in place so they stay put as you want them.
With Stampin' Dimensionals, adhere the sentiment to the tag/ribbon combo.
Add this section flat, centered vertically, to the card.
Rainbow
Smiles.


That is such a pretty card! I love those designer series papers so much that I picked them TWICE a my sale- a- bration freebies. Pinned.
ReplyDeleteThanks, Joanne! I thought they were terribly cute too! So cheery!
DeleteThis card is sooooooooooo pretty! I love everything about! The colors are wonderful!
ReplyDeleteAw, thank you so so much!
DeleteThat is so pretty, I feel like it would make someone's day to receive it.
ReplyDeleteOh, thanks, Julie! You make me smile!
DeleteThis is a beautiful design. It reminds me of a patchwork quilt -- love the colors. Thank you for linking up at Talent-Sharing Tuesdays Link-Up 9.
ReplyDeleteCarol
www.scribblingboomer.com
Thank you, Carol! I love that comparison to a patchwork quilt!
DeleteIt's adorable! I am loving the rainbows and polka dots. Thanks for sharing at Vintage Charm. xo Kathleen
ReplyDeleteThanks, Kathleen! I'm glad it achieved what I'd hoped it would!
DeleteThis is such a cute and fun card. I can see using that design for a little girl's birthday card and they would love it. #HomeMattersParty
ReplyDeleteThanks, Donna! You are right about a little girl's birthday card. Always into rainbows!
Delete