As you probably already know, there are two techniques in papercrafting that are referred to as "embossing".
One, dry embossing, used to be done with a stylus through a stencil onto cardstock. Nowadays though dry embossing is done by a much simpler means: the embossing folder. Dry embossing gives a bit of dimension in a raised surface, lending lots of eye interest in the texture it provides. I love it!
The second embossing technique, referred to heat embossing, requires a stamp (usually), a sticky clear ink, such as VersaMark, embossing powder and a heat tool. I find heat embossing to be one of the most magical processes one can experience while doing papercrafting.
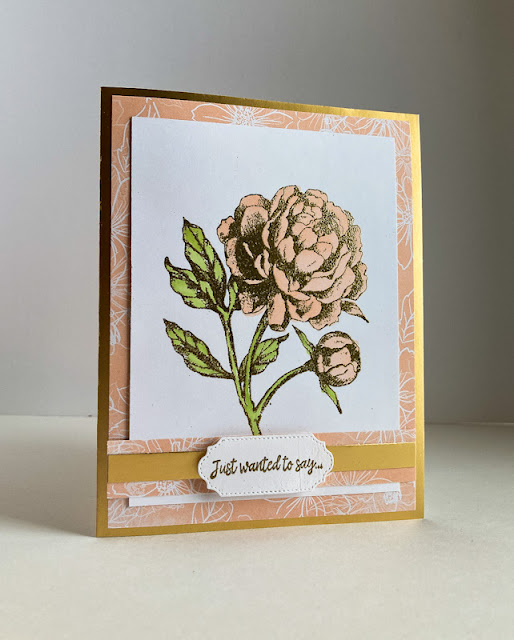
Today's card features heat embossing in two spots: on the flower, as well as the sentiment. Using gold embossing powder gives any image a truly elegant and expensive look.
Even though this flower would have been gorgeous in its embossed state only, I decided to add a bit of realism to the flower and leaves with a little coloring with Stampin' Blends. This way I could pick up on the soft pink in the Designer Series Paper behind the flower.
In the following photo, I angled the card towards the sun to show off the embossing. To echo the metallic gold of the embossing, I also incorporated brushed gold cardstock, both as the card base and also behind the sentiment label.
Following I will share with you a tutorial on how to make this card.
SUPPLIES:
Brushed Gold Cardstock
White cardstock
Friendly Hello Designer Series Paper (a freebie from the recent Sale-A-Bration)
VersaMark ink
Prized Peony (page 73, Annual Catalog)
Many Messages (page 42, Annual Catalog, but RETIRING!)
Stampin' Blends in: Light Granny Apple Green and Dark Petal Pink
Die Cutting/Embossing Machine
Ornate Frames (page 164, Annual Catalog, but RETIRING! A HUGE BOO!)
Heat Tool (page 128, Annual Catalog)
Embossing Buddy
Gold Embossing Powder (page 128, Annual Catalog)
Stampin' Dimensionals
INSTRUCTIONS:
Fold a 5 1/2" x 8 1/2" piece of brushed gold cardstock in half, creasing it well with a bone folder.
If you don't have brushed gold cardstock, this card can be created using white cardstock.
To this, add a subtle piece of Designer Series Paper. The DSP used in my card is Petal Pink and white.
The next section will be done on a 3 1/2" x 4 3/4" piece of white cardstock. After rubbing the cardstock well with the embossing buddy, stamp the large peony image in VersaMark ink. Add to this gold embossing powder, tapping any excess powder back into its container. Use the Heat Tool to set the embossing powder.
This card would look stunning if left just as gold embossed. I, however, chose to color in my flower. I used Light Granny Apple Green and Dark Petal Pink Stampin' Blends to do so.
Center the flower piece onto the DSP on the card base.
On a scrap of white cardstock, stamp the sentiment in VersaMark ink and emboss it with gold embossing powder.
Use a die from Ornate Frames (if you don't already own this die set, QUICK order it before it retires!) to die cut the sentiment.
Cut a piece of the DSP you used for the the background to 3/4" x 4" and add it to the lower portion of the stamped piece so you have about 1/8" of white cardstock showing under the DSP.
To this, add a 1/4" x 4" piece of the leftover brushed gold cardstock.
Add the sentiment label centered atop this with a few Stampin' Dimensionals.
Have you ever tried embossing? Which, dry or heat, is your favorite?
Embossed
Smiles.


I love your card! I like both dry and heat embossing. Although heat embossing requires a little luck, it is magical when it works right. It's been some time since I've done some heat embossing, but I love the effect.
ReplyDeleteThanks! Oh, you think it requires luck? I never have a problem with it. I think the secret is to keep the heat tool a few inches from the cardstock and make sure it is continuously moving. I always tell my workshop attendees that you can angle the embossing to make sure it is all shiny. If any of the spots remain powdery looking, hit it with some more heat. I also admonish them to be careful as embossing powder melts at 350 degrees. Hot stuff! Try it again -- and good luck!
DeleteI've been pulling out my embossing powder quite a bit lately and I am loving how it elevates my cards just a bit. You have made such a pretty card!
ReplyDeleteThanks, Joanne! Yes, I agree that heat embossing is nothing short of magical.
DeleteThe embossing adds a beautiful new dimension to the card. It really sets off the peony image. Thank you for participating in Talent-Sharing Tuesdays Link-Up 14.
ReplyDeleteCarol
www.scribblingboomer.com
Thanks so much, Carol! And thanks also for letting me share with you!
DeleteThis is such a lovely card Linda! I always loved the look of heat embossing but never invested in the supplies (felt it was too dangerous to do with rambunctious cats with big fluffy tails running around! But I've always enjoyed making embossed cards when I've visited my friends!
ReplyDeleteCONGRATS - you are on our Featured Guests at Inspire Me Monday at Create With Joy!
Thanks! I've always done embossing with my cats around. I think maybe the noise of the heat tool is enough to keep them at bay. Not much to invest: a heat tool, VersaMark Ink and the embossing powder. Then time to have fun!
DeleteI’ve not embossed. But your card is beautiful!
ReplyDeleteThank you for sharing your talent at the Sunday Sunshine Blog Hop 14!
Laurie
Ridge Haven Homestead
Thank you, Laurie! You must try heat embossing! It is magical. If you do and have any questions, call out to me!
Delete