July 30, 2022

BACHELOR BUTTONS

Back when I was growing up, my mom was always so proud of her flower beds. I too was enthralled with all the beautiful flowers she grew. 

The ones I have the fondest memories of though were the beautiful blue bachelor buttons. Bachelor buttons come in hues of pink, purple and blue. But, of course, my favorite is the blue one because that is the only color Mom raised.

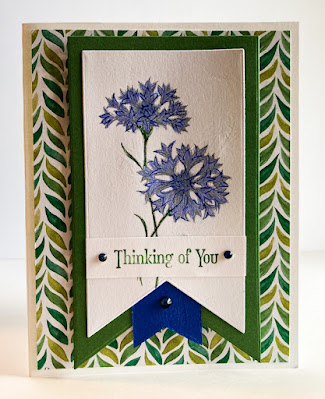
One of the freebies that can be earned during Sale-A-Bration is a stamp set called Wonderful World (page 14 in the Sale-A-Bration brochure) and one of the stamps from this set is a pretty duo of bachelor buttons.


To color my flowers as realistically as possible and match those I grew up with, I grabbed my Stampin' Write Markers. The colors I used included Brilliant Blue, Almost Amethyst and Garden Green. Before adding the colors, however, I stamped the image in Smoky Slate ink. I'd tried it with black ink, but the only way I could get the color to show up nicely was to use the gray ink.

And, yes, I realize that Brilliant Blue and Almost Amethyst are both long retired, but I still have every one of my Stampin' Write Markers. None of the current colors come close enough to the true color of these pretty flowers. So, another step back in time.


I had a pretty scrap of Designer Series Paper left over from another project that boasted a couple shades of green. So that was my background.

I cut the flower image out with a banner die, then followed with another larger pennant die on Garden Green cardstock. A miniature banner was cut from some retired Brilliant Blue cardstock and nestled between the white and green layers..


The sentiment was taken from the Quiet Meadow stamp set (page 68, in the Annual Catalog) and is stamped in Garden Green. 

To pick up on the blue a little bit more than in just the flowers, I added a trio of blue rhinestones.

Other than the little elevation of the rhinestones, the only dimension on this card comes from popping up the layered pennants with Stampin' Dimensionals.


Do you ever experience a little trip back to your childhood when something you come across serves as a trigger of sorts? This provided such a nice walk back down memory lane.

My parents sold that house when they moved into an assisted living facility. I wonder if the flowers still come up each year at the house? I hope so!

Childhood
Smiles.


July 26, 2022

WARM WISHES

 Here it is, almost the end of July, and I haven't yet posted a Christmas in July card! Well, before the month is actually in the past, here it is for you!


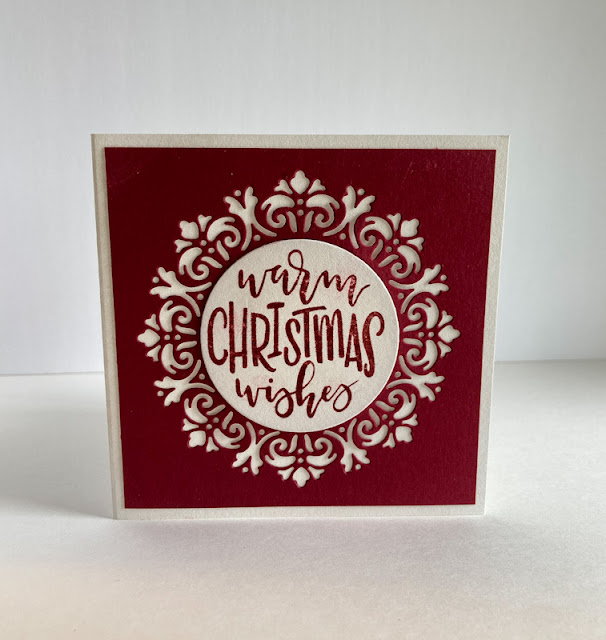
A card that maybe looks a bit on the complicated side, it is actually very easy to create. That is, if you still have the dies and stamps. 


Here you go: a tutorial on making this card.

SUPPLIES:
White cardstock
Cherry Cobbler cardstock

Cherry Cobbler ink

Encircled in Warmth stamp set (retired)

Die Cutting/Embossing Machine
Encircled in Beauty dies (retired)
Layering Circles dies (page 172, Annual Catalog)
Stampin' Dimensionals

DIRECTIONS:
Fold a 4 1/4" x 8 1/2" piece of white cardstock in half, creasing it well with a bone folder.

Cut a piece of Cherry Cobbler cardstock to 4" x 4". Centering the ornate circle die onto this piece of cardstock, die cut the curly wreath shape.

Adhere this to the white card base.

On white cardstock, in Cherry Cobbler ink, stamp a sentiment.

From the Layering Circles dies, select a circle die with a 2 1/4" diameter. Die cut the sentiment with this.

With Stampin' Dimensionals, add the sentiment circle over the circle cut with the previous die.

There! All finished! Simple and fun, right?


Warm
Smiles.


July 23, 2022

EUCALYPTUS FLOWER

My brother-in-law sent me flowers for my birthday earlier this month. It was a lovely lush bouquet that smelled so wonderfully those first few days. And, much to my delight, there were lots of varied greenery stems.

Several days after I received the bouquet, a leaf from one of the eucalyptus stems fell onto the counter. I picked up the leaf to throw it away. However, it never made it to the garbage. Once it was in my hand, I felt the leaf, enjoying the feel of it, and, of course, simultaneously wondering if I could use a few of these lovely leaves in a creation.

In the photo, you can see how I utilized this leaf, along with three of its brothers.


Since each of the four leaves is a good size -- approximately 2 1/4" across -- I needed to use a flower that wouldn't be overwhelmed by these leaves.

I ended up using the large flower stamp from the retired set, Beautiful Day. 


I started by stamping the flower twice in Memento Tuxedo Black ink. One of them I colored in completely with Stampin' Blends in Dark Mango Melody, Light Mossy Meadow and Light and Dark Calypso Coral. 

For the second stamped flower I only colored in four petals.


After coloring all the bits, I fussy cut the whole flower as well as the four extra petals.  I carefully popped the four petals over their counterparts on the whole flower with Stampin' Dimensionals. You can see in the whole flower below that the four petals were fairly naked since they were going to be covered up with the four separate petals.


I used Green Glue to adhere the leaves to a 4 1/4" square of Mossy Meadow cardstock because this was the color that matched the leaves closest. I did consider embossing this piece, but decided against it because I felt the lovely leaves would give it the interest the creation requred.


Then, using Stampin' Dimensionals in a couple of spots, I adhered the flower on top of the leaves.


The final step was to mount it to a piece of Calypso Coral cardstock that measures 4 1/2" square.

Since the bottom eucalyptus leaf extends beyond the edge of the piece, I show it on a small easel.

I do not plan on using this as a card that will be mailed out or given to someone. I will be using it as a decor piece in my living room. Sort of a little lasting gift to myself.


So, there you have another example of upcycling. Most people would have picked up the fallen leaf and tossed it in the garbage. As per my personality, I weighed the possibilities of using it in a craft project. To be honest, the bouquet is now all gone to the garbage heap, except a handful of eucalyptus leaves. My mind is already planning.

Upcycled
Smiles.


July 19, 2022

HAPPINESS ABOUNDS

I just love the look of stamping on Designer Series Paper, then fussy cutting.

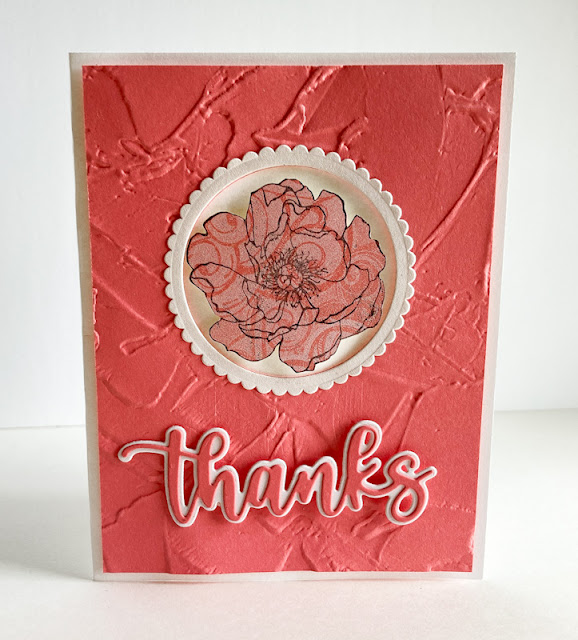
For this card, I used the large flower from the Happiness Abounds stamp set on a subtle tone on tone piece of Designer Series Paper. After the stamping, I fussy cut the flower.


I created a circular hole in the outer layer of the card 
and popped the flower inside its circle for presentation.


Just a modest amount of dimension. 
The textured background keeps the solid Flirty Flamingo layer 
from being too boring.


The scalloped circle framing the opening for the flower 
gives the card a bit of frivoloty. 
And, of course, the wonderful word from the Amazing Thanks die set!


Following is a tutorial on how to make a card similar to this one. Of course, any color combination at all would work beautifully!

SUPPLIES:
Flirty Flamingo cardstock
White cardstock

Happiness Abounds (page 109, Annual Catalog)

Black ink

Die Cutting/ Embossing Machine
Layering Circles dies (page 172, Annual Catalog)
Amazing Thanks Dies (page 169, Annual Catalog)
Painted Textures embossing folder (page 177, Annual Catalog)
Stampin' Dimensionals, both regular and small

INSTRUCTIONS:
Fold a 5 1/2" x 8 1/2" piece of white cardstock in half, creasing it well with a bone folder.

Choose a subtly designed piece of Designer Series Paper, preferably tone on tone. Stamp the largest flower from the Happiness Abounds stamp set onto this DSP in black ink. Fussy cut the flower. Set it aside for now.

Cut a coordinating piece of cardstock to 4" x 5 1/4". Emboss it with the Painted Textures Embossing Folder.

From the Layering Circles die set, select the die that measures 2 1/8" in diameter. Center this die on the embossed piece, leaving even margins at the top and sides, and die cut it.

Choose the scalloped circle just a size up from the first circle and, from white cardstock, die cut one of these. Run it through the die cutting machine once again with the first circcle die centered inside to create a scalloped frome. Adhere this scalloped frame even with the circle cut in the colored cardstock.

Center this piece onto the card base and adhere it in place with Stampin' Dimensionals.

With Dimensionals once again, secure the fussy cut flower in the center of the circle.

From white cardstock, die cut the less detailed portion of the Amazing Thanks "thanks". Die cut the detailed part of the word from the matching cardstock you chose. Attach this to the bottom of the card with Mini Stampin' Dimensionals.


Fussy
Smiles.


July 16, 2022

WILD AND SWEET

Being a lover of animals of any kind, when I spotted the Wild and Sweet set in the Annual Catalog (page 87), I was immediately smitten and couldn't wait to get my hands on these cute stamps.

As soon as it arrived on my doorstep, I brought it down to my Creation Station and went to work with all three of the images.

Do any of you have this set -- and, if you do, have you used it? What did you think of the stamped quality of the images? 

I was disappointed.


I stamped each of them with different black inks, but failed to get any satisfactory images. So I worked with what I had, using black pens and Stampin' Blends liberally to make them look a little better.

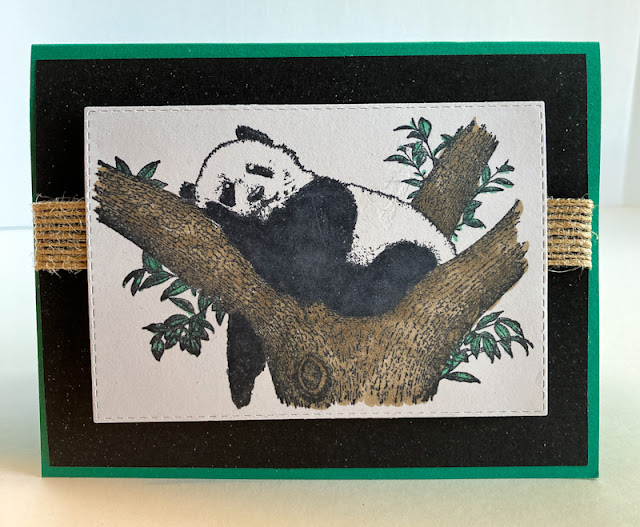
These images are actually stamped in Memento Tuxedo Black ink so I could use my Stampin' Blends on them. The colors I used were Light Gray Granite, Dark Crumb Cake, Light Basic Black, Light Smoky Slate and Light Shaded Spruce.

To pick up on the Shaded Spruce for unity on all three, I added the black layer onto a Shaded Spruce card base.

The three characters were die cut with the Stitched Rectangles dies. I added a strip of burlap trim to each one so they looked like a set.

Comment on the set?

Wild
Smiles.


July 12, 2022

FEEL GOOD WISHES

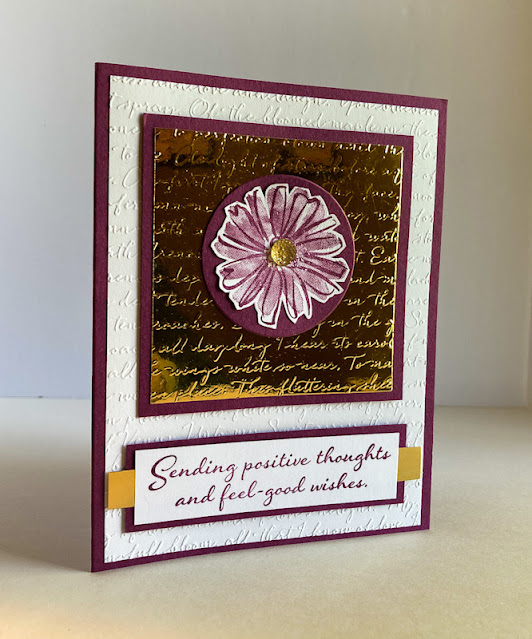
I must say that foil cardstock is tons of fun to play with. But . . . horrible to photograph. So I did my best to share with you the beauty of embossed foil cardstock.


I am talking about the cool backdrop for the Rich Razzleberry flower:


In the following photo, you can see the embossed foil cardstock a little better. It is also apparent that I used the same embossing folder on the white layer. I felt it really needed  that texture to add more interest and to echo the look of the embossing on the gold.


Here's a tutorial on how to make a card similar to this one.

SUPPLIES:
White cardstock
Rich Razzleberry cardstock
Gold Foil Cardstock

Color and Contour stamp set (page 97, Annual Catalog)

Rich Razzleberry ink

Die Cutting/Embossing Machine
Layering Circles dies (page 173, Annual Catalog)
Script Embossing Folder
Gold Gems
Stampin' Dimensionals

INSTRUCTIONS:
Fold a 5 1/2" x 8 1/2" piece of Rich Razzleberry cardstock in half, creasing it well with a bone folder.

Cut a piece of white cardstock that measures 4" x 5 1/4" and emboss it with the script embossing folder. Add this to the card base.

Cut a 3" square of gold foil cardstock. Run this through the embossing machine. Add this to a 3 1/4" square of Rich Razzleberry cardstock.

Adhere this square to the card front with even margins at the top and the sides.

On a scrap of white cardstock, stamp the flower from the Color and Contour set in Rich Razzleberry ink. Fussy cut the flower.

From Rich Razzleberry cardstock, die cut a 1 7/8" circle using the Layering Circles die. Adhere the fussy cut flower to the center of this circle.

Add a 1/4" gold gemstone to the center of the flower.

Use Stampin' Dimensionals to add this slightly raised from the center of the gold embossed piece.

In Rich Razzleberry ink, stamp a sentiment onto a 1" x 3 1/4" strip of white cardstock.

Adhere a strip of the gold foil cardstock that measures 3/8" x 3 7/8" to the back of the sentiment piece, with the two ends extending evenly at the sides.

Add this to a 1 1/4" x 3 1/2" piece of Rich Razzleberry cardstock.

Use Stampin' Dimensionals to attach the sentiment piece to the bottom of the card.


Foiled
Smiles.


July 9, 2022

BOUNTIFUL BUTTERFLY

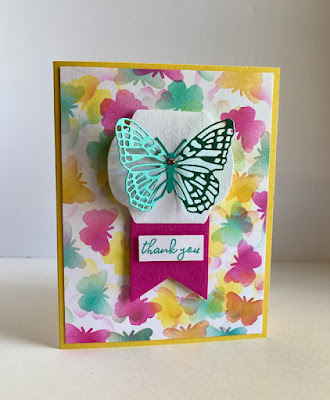
Thanks to another Paper Pumpkin kit, I got a FREE STENCIL! And that stencil enabled me to make the bright and fluttery card below.


Shown in the photo that follows is the stencil I used. As you can tell, it was the left over piece after punching out a plethora of butterflies. Yay.

I'm sure it's obvious which of the butterflies I used for my stenciling. I chose to use one of the butterflies in the top two rows as compared to those in the last four rows, as my chosen butterfly has a bit more detail. Can you see that?


To do the stenciling was actually oodles of fun and so liberating! Not being careful at all, I used a Blending Brush to add Daffodil Delight, Magenta Madness and Coastal Cabana inked butterfliesall hither and thither.

Some of the butterflies were only partial, while there is a lot of overlapping going on. I was careful to choose three colors that played well together without giving me muddy looking butterflies.


The card practically planned itself once the butterfly background was finished.


The finished card proudly sitting atop the stencil:


I  did all the stenciling on a 4" x 5 1/4" piece of white cardstock, added to a card base of Daffodil Delight.

In fact, I incorporate all the colors I used in the butterflies elsewhere on the card. The die cut butterfly, using the Brilliant Wings die set on page 169 of the Annual Catalog, is cut from Coastal Cabana cardstock. The pink banner is die cut from Magenta Madness cardstock, and then, of course, the Daffodil Delight card base.

A die from the Seasonal Labels dies (page 174, in the Annual Catalog) gives a good landing spot for the butterfly, whose wings are gently uplifted. Is he just landing -- or ready to take off?


Have you had a chance to use any free stencils lately? What fun!


Fluttery
Smiles.


July 5, 2022

BEARY WELL

I love the versatility of the Paper Pumpkin kits. Once in awhile I will put the projects together as per the instructions in the kit.

Usually, however, I would rather do something that will make the creations all my own.

OK. I am going to share a stupid little story to you here. Many years ago, I was at a stamping workshop at someone else's house. I'd gone by myself, so I didn't know any of the people there. I was sitting at a table across from a stranger, working diligently on my card. As usual, I had changed it up to my own specifications. I could sense the lady across from me studying what I was doing. All of a sudden, she said, "Um. You forgot . . . " I answered, "I know. But this is the way I want to do it." Looking at me increduously, she shrugged and uttered, "To each his own," and went back to creating her card as per instructed.

I bet that was 15 or more years ago, but I will never forget that exchange. Shame on me for not following instructions!

That is why, when I have workshops, I encourage all my attendees to make their creations their own. Just because my sample was done one way doesn't mean that's the ONLY way.

Anyway, that's how I am with the Paper Pumpkin kits.

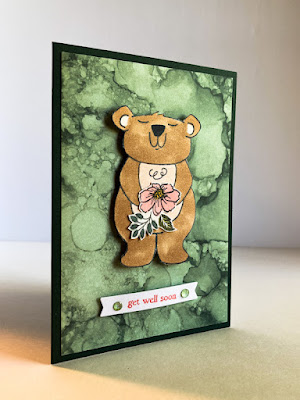
The card shown below is a perfect example. I used parts of two different Paper Pumpkin kits to make this little card.


The marble-y background was from a fairly elegant kit. Not caring for what following the kit's instructions would yield, I set these pretty pieces of paper aside until something else came to mind.

The adorable bear was a stamp from yet another Paper Pumpkin kit. I love this little guy and have used him in a few projects since he came into my life.

After stamping little bear in Memento Tuxedo Black ink, I colored him in with the following Stampin' Blends: SU 500, SU 900, and Light Basic Black.

The Blends with the numbers are those that come in the Natural Tones Stampin' Blends set on page 128. This set of five different hues of browns and lighter skin tones is a newfound blessing to me. I absolutely love them! But their names are all numbers.

Anyway, once the bear was colored, I fussy cut him and used Stampin' Dimensionals to adhere him to the marbled background.


Little bear is holding a pretty bouquet that was stamped in Memento Tuxedo Black ink from a past Sale-A-Bration set, Friendly Hello.

For the bouquet, I used Light Old Olive, Light Evening Evergreen, and Light Flirty Flamingo Stampin' Blends. Once the coloring was finished, I fussy cut the bouquet and attached it to little bear so it seemed as if he's holding the flowers.


For the sentiment, which comes from the Through It Together set, found on page 69 of the Annual Catalog, I used Flirty Flamingo ink on a strip of white cardstock that measures 3/8" x 2", flagged on the ends. 

To each side of the words, I added two embellishments I got off the Clearance Rack, Genial Gems.

This strip was adhered below little bear with Mini Stampin' Dimensionals.

The whole finished front was adhered to another Paper Pumpkin component, a dark green card base that is white inside.


As a Paper Pumpkin subscriber, do you tend to make the creations as the kit instructions tell you? Or, do you march to your own drummer like me, and change it all up to make it uniquely yours?

Beary
Smiles.


July 2, 2022

#dailycreating FEBRUARY 2022

Thhe beginning of a month equals my sharing of drawings as part of the #dailycreating Facebook Group, hostessed by artist Terry Runyan. 

At this point, I'd been part of this wonderful group for 2 1/2 years. Members of the group are encouraged to be creative in some way every day. And, if we choose to do so, to share our daily creations with the other members of the group. There is always a prompt list to work from if we choose to. The prompts are optional.

I am sad to say that, along about February, I was starting to become disenchanted with my output for the group. I just don't feel like I'm as driven as I was in the beginning to be creative. I was feeling more and more stress, and the daily drawing of animals/birds -- well, I just wasn't feeling it.

Fortuitously about this time, I came across a form of art that was new to me, although it had been "created" as an art form in 2014. Meant as a stress reliever type of art, it is called Neurographic Art. I watched many videos on this style of creating, and after awhile, I'd become smitten, deciding that this is exactly what I need during this stressful time of my life. So, I started to dabble in it, generally following the instructions I had gleaned from the videos. 

Two of the pieces that I am showing you today are what would be loosely considered Neurographic Art. I will label them as such, although they are immediately reccognizable as a departure from my normal work.

Since these first Neurographi Art pieces I dabbled with in February, I have tweaked the way I do it to make it all my own. Soo I just say my work is based on Neurographic Art. Each one takes a few days to finish. In the coming months, I will show you more of these pieces. 

As always, I will add above each piece the prompt, if I followed it, as well as any other pertinent information you may find interesting. 

Suffice it to say that I am still creating every day; it's just not always in tune with Terry's wonderful prompts. 
#thing on thing

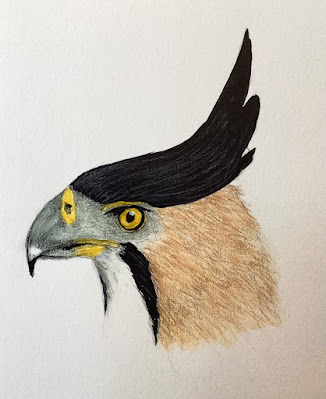
ornate hawk eagle / mexico and belize


#red

#thing on thing
pyrrhuloxia (desert cardinal) / southwest united states - northern mexico

#off prompt
neurographic art

#off prompt
neurographic art

#thing on thing
red-legged honeycreeper / southern mexico south to cuba

#favorite color
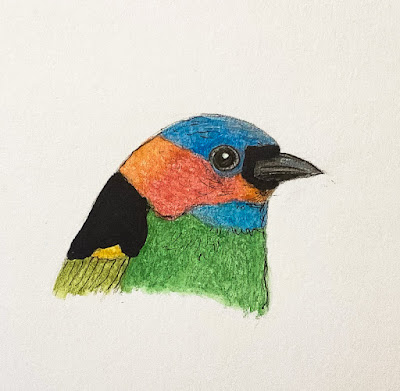
red-necked tanager, south america

#caturday

Oh my. This is truly pathetic. In the coming months (after February), my actual drawing becomes even more sparse as I work my way through whatever this is. I hope my drawing muse comes back from vacation soon.

I have prints of some of my drawings, and could get others made. Please don't use any of my artwork without my express permission.

Well, off to do a little stress relieving -- and it's not drawing an animal or a bird.

#daily
Smiles.