I love the versatility of the Paper Pumpkin kits. Once in awhile I will put the projects together as per the instructions in the kit.
Usually, however, I would rather do something that will make the creations all my own.
OK. I am going to share a stupid little story to you here. Many years ago, I was at a stamping workshop at someone else's house. I'd gone by myself, so I didn't know any of the people there. I was sitting at a table across from a stranger, working diligently on my card. As usual, I had changed it up to my own specifications. I could sense the lady across from me studying what I was doing. All of a sudden, she said, "Um. You forgot . . . " I answered, "I know. But this is the way I want to do it." Looking at me increduously, she shrugged and uttered, "To each his own," and went back to creating her card as per instructed.
I bet that was 15 or more years ago, but I will never forget that exchange. Shame on me for not following instructions!
That is why, when I have workshops, I encourage all my attendees to make their creations their own. Just because my sample was done one way doesn't mean that's the ONLY way.
Anyway, that's how I am with the Paper Pumpkin kits.
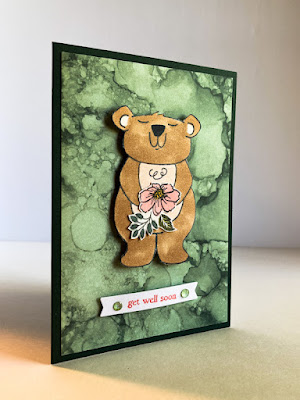
The card shown below is a perfect example. I used parts of two different Paper Pumpkin kits to make this little card.
The marble-y background was from a fairly elegant kit. Not caring for what following the kit's instructions would yield, I set these pretty pieces of paper aside until something else came to mind.
The adorable bear was a stamp from yet another Paper Pumpkin kit. I love this little guy and have used him in a few projects since he came into my life.
After stamping little bear in Memento Tuxedo Black ink, I colored him in with the following Stampin' Blends: SU 500, SU 900, and Light Basic Black.
The Blends with the numbers are those that come in the Natural Tones Stampin' Blends set on page 128. This set of five different hues of browns and lighter skin tones is a newfound blessing to me. I absolutely love them! But their names are all numbers.
Anyway, once the bear was colored, I fussy cut him and used Stampin' Dimensionals to adhere him to the marbled background.
Little bear is holding a pretty bouquet that was stamped in Memento Tuxedo Black ink from a past Sale-A-Bration set, Friendly Hello.
For the bouquet, I used Light Old Olive, Light Evening Evergreen, and Light Flirty Flamingo Stampin' Blends. Once the coloring was finished, I fussy cut the bouquet and attached it to little bear so it seemed as if he's holding the flowers.
For the sentiment, which comes from the Through It Together set, found on page 69 of the Annual Catalog, I used Flirty Flamingo ink on a strip of white cardstock that measures 3/8" x 2", flagged on the ends.
To each side of the words, I added two embellishments I got off the Clearance Rack, Genial Gems.
This strip was adhered below little bear with Mini Stampin' Dimensionals.
The whole finished front was adhered to another Paper Pumpkin component, a dark green card base that is white inside.
As a Paper Pumpkin subscriber, do you tend to make the creations as the kit instructions tell you? Or, do you march to your own drummer like me, and change it all up to make it uniquely yours?
Beary
Smiles.


I was always like that too! Mostly I used the sample card and the "ingredients" to make up my own card (or else I doctored it up and changed it a bit the next day using my own supplies). This is such a cute card!
ReplyDeleteIsn't it more fun to make it your own? I don't always like following directions. I'm so glad you like mine! Thanks, Joanne!
DeleteWhat a cute bear!! Thanks for sharing at My Big Fat Menopausal Life's Share the Wealth Party. Your participation is greatly appreciated!! Have a fabulous week.
ReplyDeleteHe IS quite the doll, isn't he? I hope you have a fabulous week also!
DeleteWe Featured your cute card at Funtastic Friday Link Party this week! Love it!
ReplyDeleteAw, thanks so much!
Delete