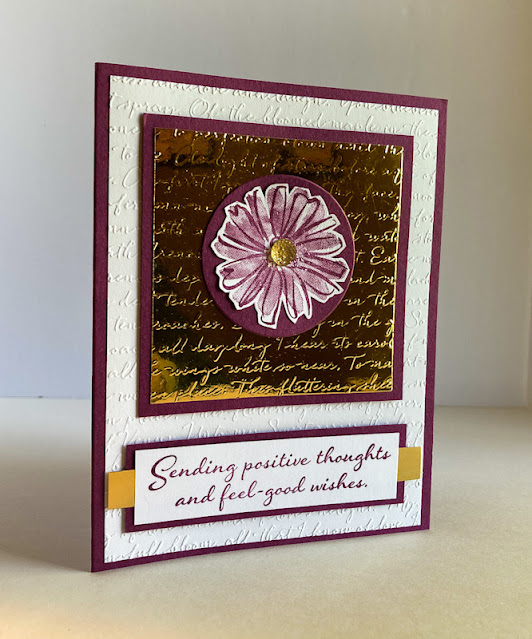
I must say that foil cardstock is tons of fun to play with. But . . . horrible to photograph. So I did my best to share with you the beauty of embossed foil cardstock.
I am talking about the cool backdrop for the Rich Razzleberry flower:
In the following photo, you can see the embossed foil cardstock a little better. It is also apparent that I used the same embossing folder on the white layer. I felt it really needed that texture to add more interest and to echo the look of the embossing on the gold.
Here's a tutorial on how to make a card similar to this one.
SUPPLIES:
White cardstock
Rich Razzleberry cardstock
Gold Foil Cardstock
Color and Contour stamp set (page 97, Annual Catalog)
Rich Razzleberry ink
Die Cutting/Embossing Machine
Layering Circles dies (page 173, Annual Catalog)
Script Embossing Folder
Gold Gems
Stampin' Dimensionals
INSTRUCTIONS:
Fold a 5 1/2" x 8 1/2" piece of Rich Razzleberry cardstock in half, creasing it well with a bone folder.
Cut a piece of white cardstock that measures 4" x 5 1/4" and emboss it with the script embossing folder. Add this to the card base.
Cut a 3" square of gold foil cardstock. Run this through the embossing machine. Add this to a 3 1/4" square of Rich Razzleberry cardstock.
Adhere this square to the card front with even margins at the top and the sides.
On a scrap of white cardstock, stamp the flower from the Color and Contour set in Rich Razzleberry ink. Fussy cut the flower.
From Rich Razzleberry cardstock, die cut a 1 7/8" circle using the Layering Circles die. Adhere the fussy cut flower to the center of this circle.
Add a 1/4" gold gemstone to the center of the flower.
Use Stampin' Dimensionals to add this slightly raised from the center of the gold embossed piece.
In Rich Razzleberry ink, stamp a sentiment onto a 1" x 3 1/4" strip of white cardstock.
Adhere a strip of the gold foil cardstock that measures 3/8" x 3 7/8" to the back of the sentiment piece, with the two ends extending evenly at the sides.
Add this to a 1 1/4" x 3 1/2" piece of Rich Razzleberry cardstock.
Use Stampin' Dimensionals to attach the sentiment piece to the bottom of the card.
Foiled
Smiles.


The card, sentiment and photos are all beautiful! Thanks for sharing at Vintage Charm. xo Kathleen
ReplyDeleteThank you so much, Kathleen! I always love your comments!
DeleteBeautiful- I love the gold with the darker papers. Thanks so much for sharing at My Big Fat Menopausal Life's Share the Wealth party. Have a wonderful week!
ReplyDeleteThank you! I am so glad you like it.
DeleteJust lovely! #AnythingGoes
ReplyDeleteThank you, Lydia!
DeleteWhat a beautiful card; it might be hard to photograph but I bet it is amazing in person.
ReplyDeleteThanks, Joanne! You are always so sweet!
DeleteLove your daisy flower!
ReplyDeleteOooh . . . what a pretty card! It features fascinating layering, depth, color, and texture. Thank you for participating in Talent-Sharing Tuesdays Link-Up 25.
ReplyDeleteCarol
www.scribblingboomer.com
Oh, Carol, thank you so much for your lovely comment!
DeleteAnother gorgeous card Linda and another feature at Inspire Me Monday at Create With Joy - - Congrats - have a blessed week! :-)
ReplyDeleteAw, thanks so much!
Delete