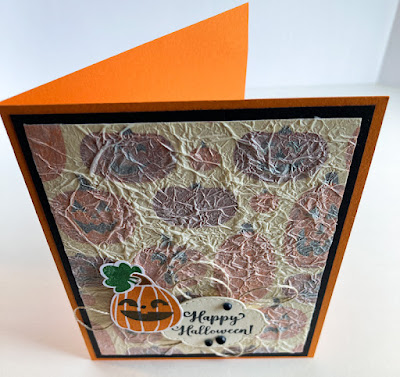
On Friday I was watching a video telling me how to do an age-old technique, only revisited somewhat. The technique, Faux Silk, is one I've been using very often over the past years, most times incorporating the topmost layer of a decorated napkin.
This take on the technique was different, however. Jessica Taylor from Ink It Up With Jessica, was showing how to do the technique by using plain old white gift tissue paper over DESIGNER SERIES PAPER!
She was doing it over flowered DSP, but I thought that, with the almost spooky look that can be achieved with this technique, I would try it with some Halloween DSP!
With the next day being World Cardmaking Day, I commented on Jessica's YouTube video that I was going to give it a try on this occasion.
The Designer Series Paper I decided to use for my card:
How the DSP looks after applying the Faux Silk Technique to it:
To apply the tissue paper to the DSP -- and this is how you do the Faux Silk Technique -- crush the tissue paper into your hand, sort of flatten it, crush again, sort of flatten it, doing this three times so you have lots of nooks and crannies (?) to give it character. Use a glue stick on the surface of the DSP ALL OVER, CORNER TO CORNER, EDGE TO EDGE. This is so so so important. Then just lay the flattened and crushed tissue paper on top of the glue, gently patting it in place. Be gentle, but firm, about this in order to retain the texture.
Once the piece is dry, use your paper snips to trim the tissue layer even with the DSP layer. Very easy to do.
I love the almost spider web look -- making it even more spooky -- my card has.
Since I loved the way the background looked, I wanted some sort of focal point that wouldn't detract from it. So I decided on a simple Halloween vignette.
For the jack-o-lantern I used Pumpkin Pie, Garden Green and Black inks on one of the pumpkins from the old retired Fall Fest stamp set.
Using the sentiment -- with a great font! -- from the also retired Wonderfully Wicked set, I stamped it in a wicked black. A die from the Stitched So Sweetly die set was perfect for cutting out the sentiment.
After adhering the pumpkin and sentiment together, I looped some Linen Thread (page 145, Annual Catalog) all around the focal point, and added it to my spidery background with Stampin' Dimensionals. A couple Black Matte Dots (page 143, Annual Catalog) finished it off just right.
I noticed that the spidery texture was even more pronounced
when looking from the top of the card!
Adding this to a layer of black cardstock, then to a Pumpkin Pie card base -- and voila! -- a cool Halloween card!
If you'd like to check out how Jessica made her card, click on either of the links above. One will take you to her blog, where the project is the first one, or the other link, which is her YouTube presentation of the project. Thanks, Jessica, for the wonderful inspiration!
^^^^^^^^^^^^^^^^^^^^^^^^^^^^^^
Make the most of yourself, for that is all there is to you.
- Ralph Waldo Emerson -
^^^^^^^^^^^^^^^^^^^^^^^^^^^^
Faux
Smiles.


I have never tried (or even heard of!) this technique. What a neat looking texture. I am definitely going to have to try this. Pinned.
ReplyDeleteOh! Have a wonderful time with it! The most important part is to have the tissue layer -- or the top ply of a napkin -- somewhat bigger than your base. And the base needs to be completely covered with glue; otherwise you won't get that wonderful texture.
DeleteI've never seen anything quite like that - wonderful effect for Halloween.
ReplyDeleteThanks for sharing at https://image-in-ing.blogspot.com/2022/10/tile-and-wood-work-at-sancar-turkish.html
Thanks! I'm so glad you like it! You will have to give it a try. Easy and fun.
DeleteI love this technique! I need to use it in my art journaling.
ReplyDeletehttps://www.kathrineeldridge.com
I'm so glad I could inspire you! Have fun with it!
DeleteI love the texture on this card. And the happy jack-o-lantern is just too cute!
ReplyDeleteThank you for sharing this post at Talent-Sharing Tuesdays Link-Up 37.
Carol
www.scribblingboomer.com
Thank you so much, Carol!
DeleteThis is such a lovely card. This looks like a fun effect to try.
ReplyDeleteThanks, Julie! You should give it a try -- and it's so easy!
DeleteSou sweet.
ReplyDeleteThank you so much!
Delete