July 31, 2023

PAPER PUMPKIN SCRAP

Hey! It's still July! So I have just enough time to sneak in another Christmas in July card!

One of my many favorite aspects of the Paper Pumpkin kits is that so frequently there are such exquisite and useful scraps included in the kits. You know, the stuff most normal people throw away?!

Case in point: the lovely white piece on which my wreath is hanging. Would you throw that away? Of course not! Look how useful it is!


When I first laid eyes on this scrap, I saw it as a window-type and envisioned a wreath hanging on it.

I love the wreaths you can make from the Country Wreaths dies on page 163 of the Annual Catalog. Working with the little red/green edges, I grabbed red and green cardstock to set out to make a Christmas card with the dies.

The wreath turned out adorably, but it needed just a bit of a little something more. I took some basic pearls and used a Dark Real Red Stampin' Blend to color them.


Since the wreath portion only took up a limited amount of space on a 5 1/2" x 4 1/4" card, I dug through some of my ancient (wood-mounted) stamps, with this specific sentiment in mind. I knew it would fit perfectly in the remaining space.

Using Real Red ink for the sentiment on a 1" x 5 1/4" in strip of white cardstock was the perfect solution. Once again, I used the Stampin' Blend to color two more pearls, this time in a larger size, to flank the word "Christmas". 


While it looked fine at this stage, I still felt like something was still missing, a little something to make the card more complete.

Finally, I dug out my Real Red Stampin' Write Marker and added a plethora of dots around the sentiment as well as on the little triangles at the ends of the waste piece.Yes! That was just right!

Have you started making Holiday cards? How many cards do you plan on creating this year?


^^^^^^^^^^^^^^^^^^^^^^

Nature abhors waste. And so should we.
― Hendrith Vanlon Smith Jr, CEO of Mayflower-Plymouth -


^^^^^^^^^^^^^^^^^^^^^^^^^

Upcycled
Smiles.


July 22, 2023

WAXY WISHES

How do you feel about recycling/upcycling? I have a penchant for considering many things that others would throw out, possibly not even bothering to recycle it, to use "garbage" in my papercrafting.

What I'm speaking of specifically in this card, is the cool almost leathery looking background. Does it look masculine? I think it surely does!


If you order things online, often the packaging in these boxes is interesting, with the potential of being used in your creative projects, rather than being thrown away. Save a landfill!

Awhile back, I received an order and in the box was very thick waxy paper. I immediatly added it to my stash of possibilities. Coming across it again recently, I decided to use it for a background on a masculine birthday card.

I cut a usable size of the waxy paper and crumpled it into a ball in my hand. I flattened it out somewhat, then proceeded to do this a few more times, until it resembled leather after the final flattening. 


To coordinate with the look of my "leather" background and hoping to make it even more masculine-looking, I used brown cardstock for the card base, and all the other elements were die cut from a light woodgrain paper.

The final touch were two gold pearls dotting the "i's". 


Here you go, a tutorial on how to make this card, provided you are lucky enough to get a piece of this waxy paper -- or something similar -- in a box containing your order.

SUPPLIES:
Soft Suede cardstock (now retired, but you can use any brown)
Woodgrain Specialty Paper
Heavy tan waxed paper

Die Cutting/Embossing Machine
Birthday words dies
All That dies (page 162, Annual Catalog)
Stitched Rectangles dies 
Gold Pearls 

INSTRUCTIONS:
Fold a 5 1/2" x 8 1/2" piece of brown cardstock in half, creasing it well with a bone folder.

Take a piece of heavy tan waxed paper that measures 3 3/4" x 4 1/2". Crush it up in your hands. Unfold it; crush again. Do this several times until, when you flatten it out, you have a very interesting leather-looking pattern. When you are pleased, set this aside.

Using rectangle dies, choose two: 3 1/2" x 4 1/2" and 3" x 4 1/4". From pale woodgrain paper, die cut first the larger rectangle. Then, place the smaller die inside the rectangle you just cut, and run it through your die cutting machine again. You will have formed a frame.

Take the flattened piece of waxed paper and adhere the frame to it. If any of the waxed paper protrudes beyond the edge of the frame, snip it off.

Adhere the completed frame to the card base.

From the same pale paper, die cut the birthday words.

Adhere the words to the waxed portion of the card so the tops of the word come about an inch down.

Die cut the decorative piece from the same paper. This is the die from the All That Dies that rersembles argyle. Add this to the bottom of the waxed part.

Add two gold gems to the "i" in both of the words.


^^^^^^^^^^^^^^^^^^^^^^^^^^

Recycling turns things into other things. 

Which is like MAGIC.

- Anonymous -


^^^^^^^^^^^^^^^^^^^^^^^^^

Recycled
Smiles.


July 14, 2023

POLKA DOTS

Isn't this frog -- with his endearing pleading eyes -- just the cutest? When I discovered this stamp in the February 2023 Paper Pumpkin Kit, Sunshine & Smiles, I was immediately smitten. So I decided to make him the star of this card.

I wanted to capitalize on the circle aspect of his eyes, so added polka dots elsewhere on the card to echo this. We have his eyes, the spots on his skin, the polka dots on the Designer Series Paper, and then, of course, a smattering of sequins.


A closeup of all the polka dots:


Following is a quick tutorial on how to make a cute froggy card like mine.

SUPPLIES:
White cardstock
Granny Apple Green cardstock
Dotted Designer Series Paper

Frog stamp from February 2023 Paper Pumpkin Kit, Sunshine & Smiles

Memento Tuxedo Black Ink
Stampin' Blends in: Light and Dark Granny Apple Green and Light Daffodil Delight

Die Cutting/Embossing Machine
Painted Labels Dies
All That Dies (page 162, Annual Catalog)
Amazing Thanks dies
Pool Party sequins
Stampin' Dimensionals

DIRECTIONS:
Fold a 5 1/2" x 8 1/2" piece of white cardstock in half, creasing it well with a bone folder.

To this card base, add a 4" x 5 1/4" piece of Granny Apple Green cardstock.

With even margins at the top and sides, add a 3 3/4" x 3" piece of dotted Designer Series Paper.

On a scrap of white cardstock, stamp the frog in Memento Tuxedo Black ink. Color him in as desired.

Using a scalloped circle die that measures 2" in diameter, cut out the frog. Add a few sequins around the frog.

Use the open circle die from the Painted Labels dies with Granny Apple Green cardstock. Adhere the frog piece to this. Using a couple Stampin' Dimensionals, add this to the center of the dotted paper.

From white cardstock, cut the large portion of the "thanks" and then cut the narrow portion of the word from Granny Apple Green cardstock. Adhere the two parts together and add the word to the green portion at the bottom of the card.


^^^^^^^^^^^^^^^^^^^^^^^^^^^^^

Sometimes you have to kiss a lot of frogs 
before you find your prince.
― Bianca Frazier -


^^^^^^^^^^^^^^^^^^^^^^^^

Froggy
Smiles.


July 8, 2023

SWEET PEAS

Omigosh,, I really really love to do projects like this one!

Occasionally, when I'm feeling sort of down and in need of some Creative Therapy, I get a hankering to do some coloring with my Stampiin' Blends. One of my favorite things to do when that happens, is to grab some of my black and white Designer Series Papers and go to work. 


For this card I used two different designs of DSP. A flower and a stripe with prominent black lines. The flowers -- which I call sweet peas, whether they really are or not -- appealed to me because when I was a little girl, my mom had sweet peas growing up a trellis, and I thought they were just the prettiest things ever. So, a little nostalgia here.

The Stampin' Blends I used were Light and Dark Rococo Rose and Light and Dark Granny Apple Green. I did my coloring quite loosely, not carefully at all. Which definitely is a departure for me. Very therapeutic also, I must say.


One thing that I should mention is something I learned when I was in college, working towards my Bachelor of Fine Arts degree. I had a professor who was adamant about not centering things. He told me, they call it "dead center" for a reason. That is why I always place my focal points either above or below the center point. I feel the same way about dividing a space exactly in half. It just deadens the space. Thus, my left panel is a little wider than the right one. It just feels and reads much better.


Since black was so prominent in these papers, I used it in a few other areas of the card to make it more cohesive. 

Do you ever add color to black and white Designer Series Papers? Doesn't it make you feel so much better?


^^^^^^^^^^^^^^^^^^^^^^^^^^^^^^

Artists are just children who refused to put down their crayons.
- Al Hirschfeld -


^^^^^^^^^^^^^^^^^^^^^^

Sweet
Smiles.


July 5, 2023

LILY BIRTHDAY

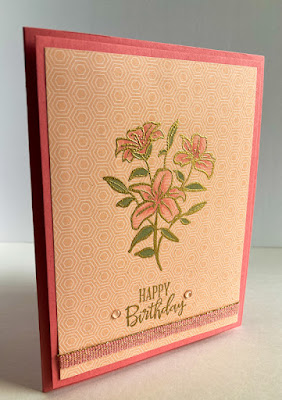
Sometimes subtlety is a nice touch in cardmaking. Not splashy or in-your-face. Just beautiful and subtle. As in my card for the day.


The Designer Series Paper upon which I stamped my lily image is subtlety personified. A very pale tone on tone. You have to look closely to even decipher that it actually is a design.


Taking my cue from the subtle design of the background paper, I continued that with my image. I embossed the lily stem in gold, then colored it in soft colors of Stampin' Blends.


To combine the soft color and the gold of the embossing, I added a strip of beautiful ribbon that featured flecks of metallic gold in it.


This photo is at a very strange angle, but it was the only position in which I could really show of the glow of the gold embossing.


Following is a tutorial on how I made this card. Enjoy!

SUPPLIES:
Flirty Flamingo cardstock
Subtle coordinating Designer Series Paper

Peaceful Moments stamp set 
Stamp from March 2023 Paper Pumpkin kit

VersaMark Ink
Stampin' Blends in: Light and Dark Flirty Flamingo and Dark Mint Macaron

Heat Tool
Embossing Buddy
Gold Embossing Powder
Polished Dots
Flirty Flamingo/Gold ribbon trim
Stampin' Dimensionals

DIRECTIONS
Fold a 5 1/2" x 8 1/2" piece of Flirty Flamingo cardstock in half, creasing it well with a bone folder.

With Stampin' Dimensionals, add a 4" x 5 1/4" piece of Flirty Flamingo cardstock.

Cut a 3 3/4" x 5" piece of a subtle coordinating Designer Series Paper. Rub an Embossing Buddy across the entire piece of DSP. In VersaMark ink, stamp a sprig of lilies so there is about the same amount of space at the top and the sides of the DSP. Cover the stamping with gold embossing powder and heat emboss the image.

Lower on this same piece of DSP, gold emboss in the same manner a sentiment.

Color in the lilies, leaves and stems as desired.

Wrap a length of Flirty Flamingo/Gold ribbon around the bottom of this panel underneath the sentiment, fastening the ends to the back of the DSP. Adhere it to the raised Flirty Flamingo layer.

Add embellishments to each side of the sentiment.


^^^^^^^^^^^^^^^^^^^^^^^

Just as the Lily blooms in the midst of adversity, 
so too can we find strength and resilience 
in the face of life’s challenges.”
- Unknown -


^^^^^^^^^^^^^^^^^^^^^^^^^^^^

Subtle
Smiles.


July 1, 2023

MERRY

Hooray! It's July 1! And you know what that means to us crafters, don't you? Christmas in July has officially begun!

If you're like me, you have lots of snippets of leftover Designer Series Papers lying around amongst your stash. This card gives a great opportunity to use up quite a few of them!


Grab a variety of Christmas-flavored DSP and go to town with either the hexagon punch, if you still have yours, or a hexagon die. Once you have a handful of these little cuties, you are ready to create your first Christmas card of the season.


By combining your design made up of lots of Christmasy hexagons with a fun dimensional background and a diecut seasonal message, you have a quick and easy card.


Since the card is pretty obvious to put together just by looking at it, here is a list of the supplies you will need:

SUPPLIES:
White cardstock
Real Red cardstock
Assortment of seasonal Designer Series Paper scraps

Die Cutting/Embossing machine
A hexagon punch or die
A seasonal word die
Stripes and Splatters embossing folders (page 169, Annual Catalog) or anything that provides good           texture
Red cord
White sequins


A merry heart doeth good like medicine.

- King Solomon -


^^^^^^^^^^^^^^^^^^^^^^^^^^
Merry
Smiles.